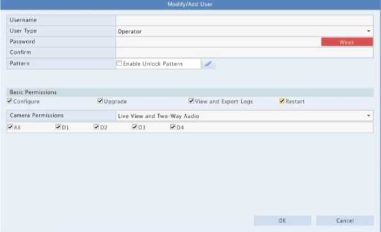
3. Set the unlock pattern, then click OK.

IP Control
Use this function to enhance security by allowing or forbidding access to the DVR from specified IP addresses.

ONVIF Authentication
Enable ONVIF authentication under System > Security > ONVIF Auth so a username and password will be required for ONVIF-based device access. Select the check box and then click Apply.
Enable Authentication 53
Note: If enabled,, a username and password will be required for access by ONV1F.
ARP Protection
ARP protocol is used to associate an IP address to a hardware MAC address. ARP attacks mainly occur on LAN, in which attackers use forged IP and MAC addresses. APR protection prevents this kind of attacks by verifying the gateway’s MAC address in all access requests.
Note that changing the NIC working mode will disable ARP protection automatically.

Video Watermark
Encrypt custom information in videos to prevent unauthorized alteration.
Camera Dllfsmart ipc} ’
Enable Watermark 3
Watermark Content 1212
Secure Password
Secure password specifies the permission of strong or weak password in different modes: friendly password and enhanced password.

If this option is selected, a strong password must be used except when login from the same network segment or one of the three private network segments (10.0.0.0/8, 172.16.0.0/12, 192.168.0.0/24).
Click Maintain > System Info to view the basic DVR information for maintenance purpose.
System Info
View the basic information such as the device model, serial number, firmware version, build date and operation time.
Basic Info
Click the Camera tab to view camera status (online or offline with possible offline cause) and status of alarm functions such as motion detection, tampering, video loss and audio detection. Off means disabled, and on means enabled.
Click the Recording tab to view recording status and stream settings.
Click the Online User tab for information about users who are currently logged in.
No, Username IP Address Login Time
1 admin 127.0.0.1 2016-04 13 23:01:55
Click the Disk tab to view the hard disk status and disk properties.
|
Product Model Serial Number Firmware Version Build Date Operation Time |
NVR 210235T0E51234567890 B3119P15 2016-11-09 0 Day(s) 0 Hour(s) 48 Minute(s) |
|
Camera DI |
Name IP Camera 01 |
Status Offline(Network Disconnected) |
Motion Off |
Tampering Off |
|
D2 |
IP Camera 02 |
Offline(Network Disconnected) |
Off |
Off |
|
D3 |
IP Camera 03 |
Offline(Network Disconnected) |
Off |
Off |
|
D4 |
IP Camera 04 |
OfflinefNetwork Disconnected) |
Off |
Off |
|
D5 |
IP Camera 05 |
OfflinefNetwork Disconnected) |
Off |
Off |
|
D6 |
IP Camera 06 |
OfflinefNetwork Disconnected) |
Off |
Off |
|
Camera |
Name |
Type |
Status |
Diagnosis |
Stream Type |
fps |
|
DI |
IP Camera 01 |
None |
No Recording |
Camera Offline |
None |
0 |
|
D2 |
IP Camera 02 |
None |
No Recording |
Camera Offline |
None |
0 |
|
D3 |
IP Camera 03 |
None |
No Recording |
Camera Offline |
None |
0 |
|
D4 |
IP Camera 04 |
None |
No Recording |
Camera Offline |
None |
0 |
|
DS |
IP Camera 05 |
None |
No Recording |
Camera Offline |
None |
0 |
|
D6 |
IP Camera 06 |
None |
No Recording |
Camera Offline |
None |
0 |
|
D7 |
IP Camera 07 |
None |
No Recording |
Camera Offline |
None |
0 |
|
D8 |
IP Camera 08 |
None |
No Recording |
Camera Offline |
None |
0 |
|
D9 |
IP Camera 09 |
None |
No Recording |
Camera Offline |
None |
0 |
|
DIO |
IP Camera 10 |
Normal |
Ongoing |
Normal |
Main Stream |
25 |
