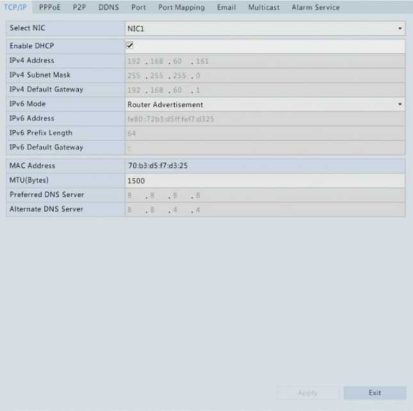
3. Click Apply to save the settings.
NOTE!
•For an DVR with multiple NICs, you can configure the NICs and
choose a default route (currently NIC1).
•If your DVR has a PoE port or a switching port, you can configure an internal NIC IPv4 address.
 CAUTION!
•If you switch the working mode, the enabled ARP protection will be disabled automatically.
•The valid MTU ranges from 576 to 1500 (1280-1500 for IPv6). To use IPv6, make sure the DVR and PC can connect to each other using IPv6 addresses. To view live or recorded videos, make sure the IPv4 addresses are also connectable.
PPPoE
The DVR allows access through Point-to-Point over Ethernet (PPPoE).
1.Click System > Network > PPPoE.
2.Enable PPPoE by selecting the check box.
3.Enter the username and password provided by your Internet Service Provider (ISP). Network information including IP address appears when dial-up succeeds.
® NOTE!
If your DVR has multiple NICs, PPPoE dial-up will be implemented through the NIC specified as the default route.
4.Click Apply to save the settings.
P2P
The DVR allows access from the cloud website or from the mobile surveillance app. You need to sign up for a cloud account at www.star4live.com first.
1.Click System > Network > P2P.
2.P2P is enabled by default.
3.To add the DVR to cloud at the cloud website: log in to your account at www.star4live.com and then add the DVR by entering the register code and device name.
4.To add the DVR to cloud using the app: scan the QR code with the app. You need to download and install the app on your mobile phone first. Contact your dealer for details.

NOTE!
•You may access the DVR through cloud if the device status is Online. The username is your cloud account name, and the device name is the name you entered at the cloud website.
•If the device is offline, the possible causes will be displayed for your reference.
•To delete the DVR from cloud, click Delete.
5.Click Apply to save the settings.
DDNS
If your DVR is connected to the Internet through PPPoE, the IP address of the network changes every time it connects to the ISP server without your awareness. This is inconvenient when you remotely access your DVR with an IP address. To avoid this issue, you can register with an DDNS server to obtain a domain name for your DVR and then access your DVR by visiting the domain name instead of an IP address (http://DDNS server address/DVR’s domain name) using a web browser.
1.Click System > Network > DDNS.
2.Enable DDNS, select a DDNS type, and then complete other settings.
•If the DDNS type is DynDNS or No-IP, enter the domain name,
username and password. The domain name is the one that you have successfully registered at a domain name registration website (e.g., DynDNS). The username and password are those of the account you have registered at the domain name registration website (e.g., DynDNS).


