Detailed Function List
|
Function Name |
Function Description |
Remarks |
|
Date Format |
Set date format such as YYYY-MM-DD W hh:mm:ss/YYYY-MM-DD hh:mm:ss/MM-DD-YYYY W hh:mm:ss/MM-DD-YYYY hh:mm:ss |
|
|
System Time Set |
Set NVR’s date |
Include year,month,week, hour,minute, second |
|
Auto gain network time |
After check the function, NVR will proofread time with network server and save |
After connecting network, NVR will proofread time with network server |
|
Time Zone |
Set NVR’s time zone |
Choose zone before network time proofread, or else cause time deviation |
|
Daylight Saving Time |
After checking the function, start daylight saving time |
|
|
“Set”button |
Set daylight saving time start and end |
|
Function instruction: Used to administrate local user and network user
Operation steps;
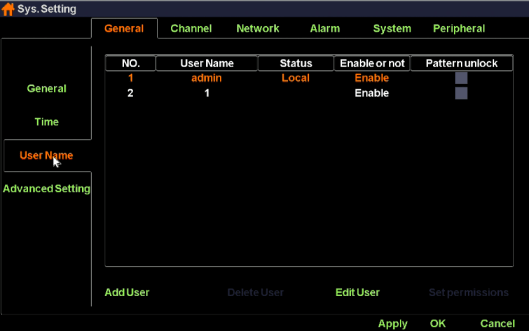
Function List:
|
Function Name |
Function Description |
Remarks |
|
User List |
Show local and network user list |
|
|
“Add”Button |
Add new user name and password,check if it is available |
Add the same user name |
|
“Edit”Button |
Edit existing user information,like password |
Admin user can’t close |
|
“Delete”Button |
Delete new added user information |
Admin user can’t delete |
|
Set Permission |
Set user permission |
admin user own all permission |
|
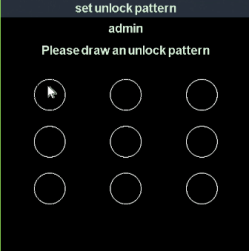
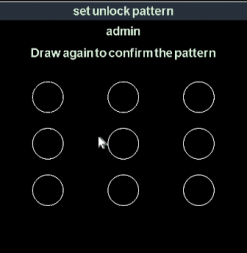
Pattern unlock |
Set pattern lock for user |
|
Local user permission list
|
Local user permission |
Permission explaination |
|
System setting |
Own all operation permission |
|
Manual recording |
0wn channel start/close and manual recording operation permission |
|
Playback |
Own channel recording playback operation permission |
|
Preview |
Own channel preview permission |
|
PTZ control |
Own PTZ control/ call preset/call route operation permission |
|
File management |
Own snapshot picture operation permission |
|
Recording backup |
Own recording backup operation permission |
|
Close system |
Own shutdown/restart operation permission |
|
Email notice |
Own alarm linkage send email operation permission |
Network user permission list
|
Network user permission |
Permission Explaination |
|
System setting |
Own remote system setting permission |
|
Manual recording |
Own remote set manual recording permission |
|
Voice talkback |
Own remote voice talkback operation permission |
|
Remote playback |
Own remote playback operation permission |
|
Remote priview |
Own remote connection/remote monitoring selected channel operation permission |
|
PTZ control |
Own remote PTZ control operation permission |
|
Remote update |
Own remote update operation permission |
|
Close system |
Own remote close system permission |
Pattern unlock operation steps:
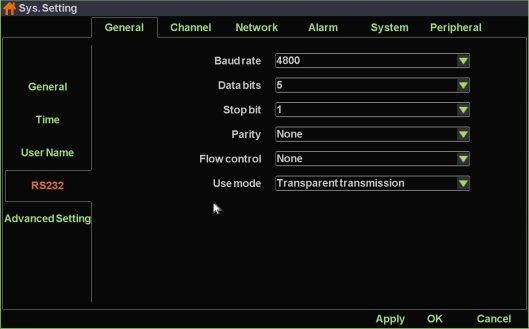
Function instruction: Used to set serial port parametres.
Operation steps:
|
Function Name |
Function Description |
Remarks |
|
Baud rate |
Used to set baud rate |
|
|
Data-bits |
Used to set data-bits |
|
|
Stop-bits |
Used to set stop-bits |
|
|
Parity |
Used to set parity |
|
|
Flow control |
Used to set flow control |
|
|
Transport method |
Used to set transparent transportation |
|
Function instruction: Used to set preview mode, channel drag mode, disable smart features, disable unlogin preview, increase the channel capacity.
Operation steps:
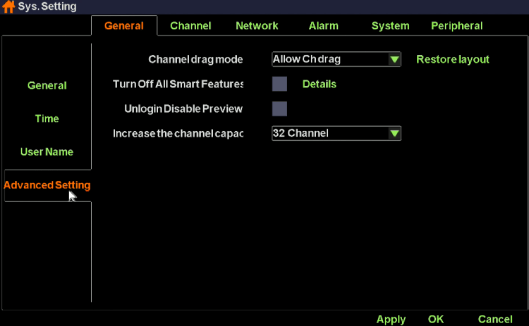
Detailed Function List:
|
Function Name |
Function Description |
|
Preview Mode |
Used to set preview mode, including Real time mode and Smooth mode |
|
Channel drag mode |
Used to set channel drag mode, including directly switch channel stream, channel stream binding with channel number and no channel drag. |
|
Turn off all smart features |
If you tick the checkbox, NVR will turn off all intelligent configurations including adding IPC devices automatically, IPC config lock, NVR IP address conflict self-adaption and IPC IP address adaption. |
|
Unlogin disable preview |
If you tick the checkbox, you cannot see any video picture when you logout. |
|
Increase the channel capacity |
Used to change the maxium channel capacity of NVR |
Function instruction: Used to set IPC stream parameters and OSD settings.
Operation steps
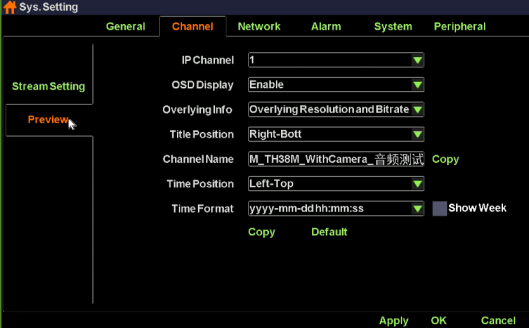
Detailed Function List:
|
Function Name |
Function Description |
|
IP Channel |
Show the channel number of current setting |
|
OSD Show |
show/hide OSD info |
|
Overlap additional information |
Set overlap additional information, including ‘no overlay’,overlay resolution’,overlay code rate, “overlay resolution and code rate” |
|
Headline position |
Heading message positon setting, support top left,bottom left,top right,bottom right |
|
Channel Name |
Channel name setting, support number,character,capital and small letter and Chinese input |
|
Time position |
Used to set channel overlay position, support top left,bottom left,uppder right, bottom right |
|
Time show format |
Used to set channel time format |
|
Show Week |
Used to set whether to show week information of the IPC OSD |
Function instruction: set system channel’s main stream rate and sub stream parameter
Operation steps;
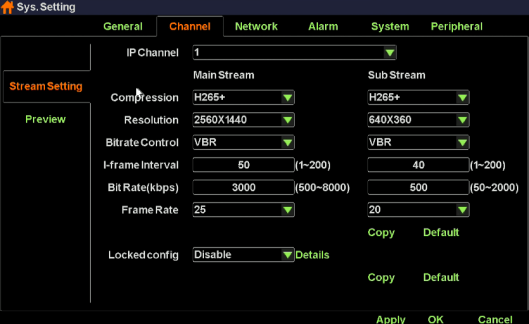
Detailed function list
|
Function name |
Function Description |
|
IP channel |
Set current channel number |
|
Encoding format |
Main/sub stream encoding format setting,support H.264, H.265,H.265+. |
|
Resolution ratio |
Main/sub stream resolution ratio setting, NVR provide resolution ratio option based on IPC ability level |
|
Bit rate control |
Main/sub stream bitrate control setting,support VBR and CBR |
|
I-frame interval |
Main/sub stream I-frame interver setting, range from 1-200 |
|
Bit rate |
Main/sub stream bit rate setting, range from 100~10000kbps |
|
Frame rate |
Main/sub stream frame rate setting, the larger the frame rate, the fluency is better |
|
Locked Config |
Enabled. If the device config are modified by NVR. It’ll be binded to device. Otherwise, It’ll be binded the most appropriate config. |
|
Disabled. IPC encode parameters will not change unless NVR local config changes. |
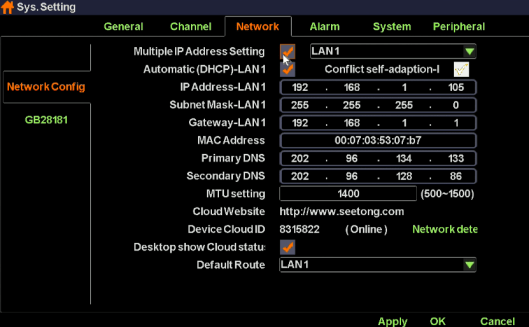
Function instruction: Configure network parameters and check out NVR device ID and P2P state. As the following picure shows:
Operation steps:
Detailed Function List:
|
IP Name |
Function Description |
Remarks |
|
Multiple IP Address Setting |
Used to give NVR device an extra IP address |
|
|
IP Address |
Used to set/modify NVR’s IP address |
|
|
Subnet Mask |
Used to show NVR’s subnet mask information |
|
|
Gateway |
Used to show NVR’s gateway address |
|
|
Primary DNS |
Show NVR primary DNS information |
|
|
Secondary DNS |
Show NVR secondary information |
|
|
MAC ADDRESS |
Used to show NVR MAC address information |
|
|
Auto acquire IP(DHCP) |
Used to gain IP address automatically |
When USE DHCP, you can’t modify IP address manually |
|
IP Self-adapt |
Used to self-adapt IP address when IP conflict occurs |
|
|
Cloud Number |
Show NVR device ID |
|
|
Website |
Show website of cloud platform |
|
|
Cloud State |
Show NVR P2P state |
You can remote access to NVR device only when the Cloud State is ‘online’ |
|
Cloud desktop show |
Control whether you would like to see P2P state at the top of desktop |
|
|
Default Route |
Used to select the gateway for NVR to surf on the internet |
|
|
Network detection |
Used to diagnose NVR and IPC network condition. |
When NVR hasn’t been activated, this position is replaced as a Activate button. |
|
Long network line support |
If you tick the checkbox, your POE devices can support long network line transport. Otherwise, your POE devices can support at most 120m Transport. |
|
|
Close Vlan |
Tick the checkbos if you need to search the POE devices in your LAN. |
|
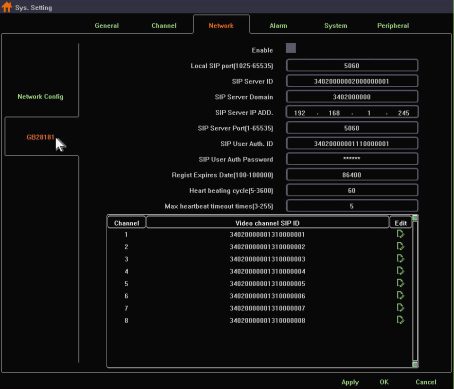
Function instruction: NVR connect to surveillance platform with 28181 protocol.
Operation steps:
|
Function Name |
Function Description |
|
Enable |
If ticked, NVR will start 28181 service |
|
Local SIP port |
Used to set Local SIP port |
|
SIP Server ID |
Used to set SIP Server ID |
|
SIP Server Domain |
Used to set SIP Server Domain |
|
SIP Server IP ADD |
Used to set SIP Server IP ADD |
|
SIP Server Port(1-65535) |
Used to set SIP Server IP ADD |
|
SIP User Auth ID |
Used to set SIP User Auth ID |
|
SIP User Auth Password |
Used to set SIP User Auth Password |
|
Regist Expires Date(1-100000) |
Used to set Regist Expires Date |
|
Heart beating cycle(5-3600) |
Used to set Heart beating cycle |
|
Max hearbeat timeout time(3-255) |
Used to set Max hearbeat timeout time |
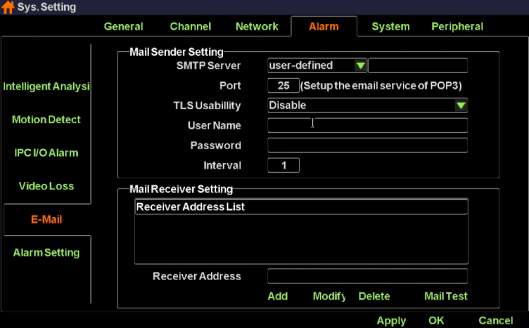
Function instruction: set email alarm parameter
Operation steps:
Detailed Function List:
|
Funciton Name |
Function Description |
|
Email Service |
select email server name,including smtp.163.com, smtp.qq.com, smtp.mail.yahoo.com, smtp.126.com, smtp.qiye.163.com. You can alse customize smtp email address |
|
Port |
Set email server port number, default is 25 |
|
TLS usability |
Control whether start email service’s encryption: support smtp.qq.com and smtp.mail.yahoo.com after you select ‘Enable’ |
|
User name |
Mail sender’s username |
|
Password |
Mail sender’s password. Attention! You should use authorized code as your password if you choose qq mailbox, 126 mailbox or 163 mailbox company version. |
|
Send interval |
Mail send interval, default is one minute, you can’t send any other email in one minute |
|
Recipient List |
List all receivers’mail address |
|
Receiver Address |
Input receiver’s mailbox |
|
“Modify”button |
Modify the mail address in the recipient list |
|
“Add”button |
Add a new mail address to the recipient list |
|
“Delete”button |
Delete a mail address from the recipient list |
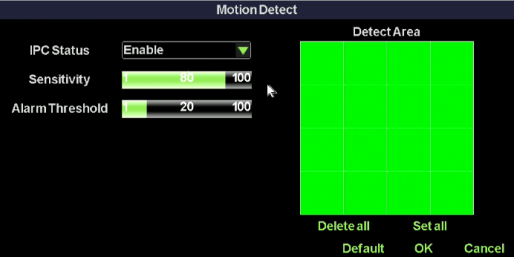
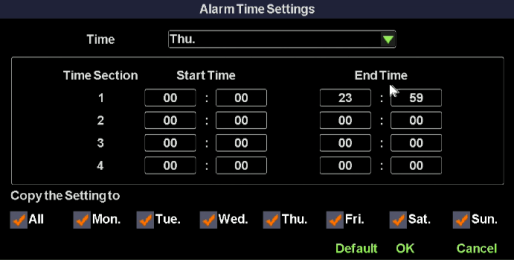
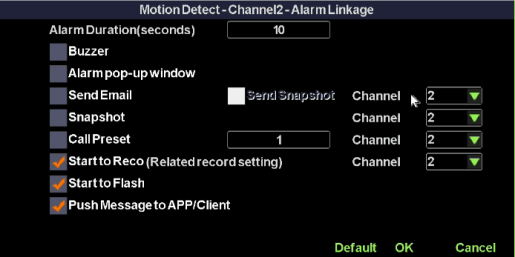
Function instruction: when Motion detected, NVR will trigger motion alarm.
Operation steps:
Detailed Function List:
|
Function Name |
Function Description |
Remarks |
|
Alarm lasting time setting |
Used to set how long the motion alarm lasts |
|
|
Buzzer alarm |
Control whether to activate buzzer alarm |
|
|
Alarm pop-up window |
NVR change current lay-out to whick include all motion devices |
|
|
Email alarm |
Control whether to send email when motion alarm detected |
|
|
Send screenshot |
Control whether to add attachment when sending an email |
|
|
Snapshot image |
Control whether to grab images when motion alarm detected |
|
|
Call preset |
Control whether to adjust PTZ device current position when motion detected |
|
|
Start recording |
Control whether to record when motion alarm detected |
|
|
Flashing |
Control whether to flashing when motion alarm detected |
|
|
Push Message to APP/client |
NVR send alarm message to your APP when alarm incident happens |
|
Function instruction: NVR will trigger alarm after detecting video lost
Operation steps:
Detailed Function List:
|
Function Name |
Function Description |
Remarks |
|
Alarm lasting time setting |
Used to set how long the motion alarm lasts |
|
|
Buzzer alarm |
Control whether to activate buzzer alarm |
|
|
Alarm pop-up window |
NVR change current lay-out to whick include all motion devices |
|
|
Email alarm |
Control whether to send email when motion alarm detected |
|
|
Call preset |
Control whether to adjust PTZ device current position when motion detected |
|
|
Push Message to APP/client |
NVR send alarm message to your APP when alarm incident happens |
|
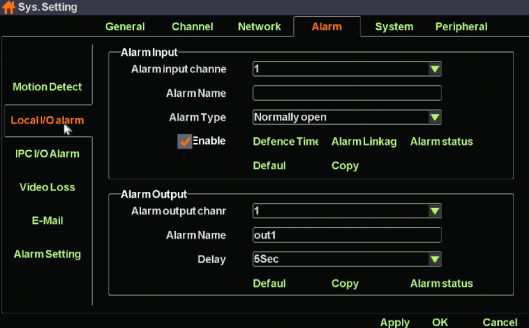
Function instruction: Used to receive alarm input and to process alarm linkage.
Operation steps:
|
|
Function Name |
Function Description |
|
Alarm Input |
Alarm type |
Used to open or close alarm input |
|
Defence time |
Used to set local alarm time schedule |
|
|
Alarm linkage |
Used to set local alarm linkage including buzzer, email, snapshot, preset call, flashing and etc. |
|
|
Default |
Set all parametres to default |
|
|
Copy |
Copy current channel configuration to other channels |
|
|
Alarm Output |
Alarm output channel |
Used to select channel |
|
Delay |
Used to set alarm output delay |
|
|
Default |
Set all parametres to default |
|
|
Copy |
Copy current channel configuration to other channels |
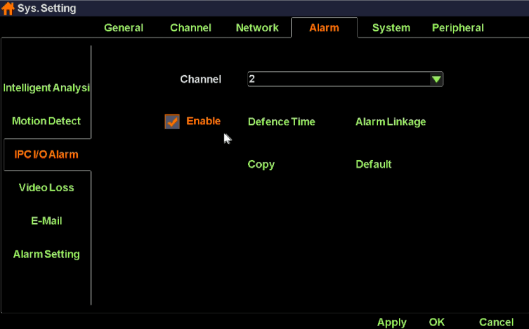
Function instruction: NVR process alarm linkage when receive I/O alarm message from IPC devices.
Operation steps:
2.Left click ‘IPC I/O Alarm Setting’ and configure ‘Defence Time’, ‘Alarm Linkage’. As the following picture shows:
Detailed function list:
|
Function Name |
Function Description |
Remarks |
|
Alarm lasting time setting |
Used to set how long the motion alarm lasts |
|
|
Buzzer alarm |
Control whether to activate buzzer alarm |
|
|
Alarm pop-up window |
NVR change current lay-out to whick include all motion devices |
|
|
Email alarm |
Control whether to send email when motion alarm detected |
|
|
Send screenshot |
Control whether to add attachment when sending an email |
|
|
Snapshot image |
Control whether to grab images when motion alarm detected |
|
|
Call preset |
Control whether to adjust PTZ device current position when motion detected |
|
|
Start recording |
Control whether to record when motion alarm detected |
|
|
Flashing |
Control whether to flashing when motion alarm detected |
|
|
Push Message to APP/client |
NVR send alarm message to your APP when alarm incident happens |
|
Used to configure IPC Intelligent Analysis parametres including Regional Invasion Alarm and Cross-Border Alarm
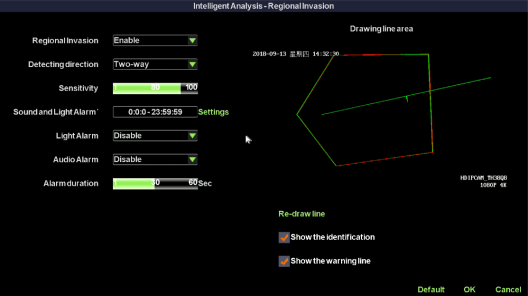
Function instruction: Used to configure Regional Invasion Alarm parametres.
Operation steps:
Detailed function list:
|
Function Name |
Function Description |
Remarks |
|
Regional Invasion |
Turn on/off regional invasion alarm |
|
|
Detection Direction |
Two-Way. That means that both going into the alarm area and going out side of the alarm area will trigger alarm incident. |
|
|
Enter. That means that only going into the alarm area can trigger alarm incident. |
|
|
|
Leave. That meas that only going out side of the alarm area can trigger alarm incident. |
|
|
|
Sensitivity |
Used to control the sensitivity of regional invasion alarm. |
|
|
Sound and Light Alarm time |
Used to set a period during which IPC can trigger alarm. |
|
|
Light Alarm |
Used to control whether the light flash when alarm triggered |
|
|
Audio Alarm |
Used to control whether the audio has output when alarm triggered |
|
|
Alarm duration |
Used to control how long the alarm last when triggered |
|
|
Redraw line |
Used to reset the alarm region |
|
|
Show the identification |
Used to control whether IPC display a checkbox on the source object which triggers alarm incident. |
|
|
Show the warning line |
Used to control whether IPC display the region boundry line |
|
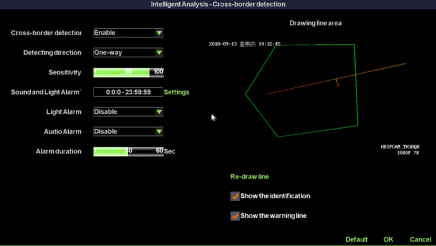
Function instruction: Used to configure Cross-Border Alarm parametres.
Operation steps:
Detailed function list:
|
Function Name |
Function Description |
Remarks |
|
Cross-border detection |
Turn on/off cross-border detection alarm |
|
|
Detection Direction |
Two-Way. That means that the alarm can be triggered from both side of the cross-border line. |
|
|
One-Way. That meas the alarm can be triggered from only one side of the cross-border line. |
|
|
|
Sensitivity |
Used to control the sensitivity of regional invasion alarm. |
|
|
Sound and Light Alarm time |
Used to set a period during which IPC can trigger alarm. |
|
|
Light Alarm |
Used to control whether the light flash when alarm triggered |
|
|
Audio Alarm |
Used to control whether the audio has output when alarm triggered |
|
|
Alarm duration |
Used to control how long the alarm last when triggered |
|
|
Redraw line |
Used to reset the alarm region |
|
|
Show the identification |
Used to control whether IPC display a checkbox on the source object which triggers alarm incident. |
|
|
Show the warning line |
Used to control whether IPC display the cross-border line |
|
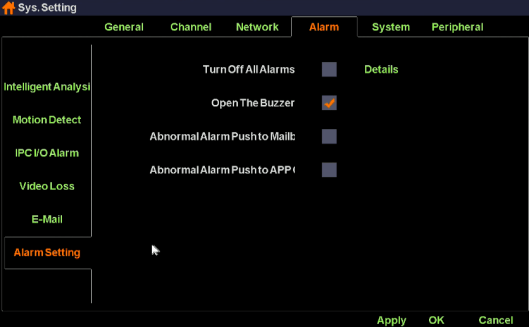
Function instruction: Used to configure alarm switch, buzzer switch, abnormal alarm push to mailbox, abnormal alarm push to APP.
Operation steps:
|
Function Name |
Function Description |
Remarks |
|
Turn off all alarms |
Control NVR whether to open alarm switch |
|
|
Open the buzzer |
Control whether buzzer works |
|
|
Abnormal alarm push to mailbox |
Control whether to enable email sending when alarm incident happens |
|
|
Abnormal alarm push to APP/Client |
Control whether to enable APP push when alarm incident happens |
|
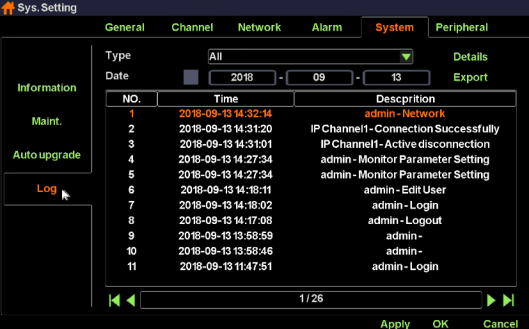
Function instruction: Used to search and export NVR’s log information
Operation steps:
Function instruction: Maintain the NVR system, including restart system according to schedule,upgrade using u-disk, reset factory, import/export
Operation steps;
Detailed Function List:
|
Function Name |
Function Description |
Remarks |
|
Reboot Setup |
Restart system according to schedule |
Default state is close |
|
Update type |
Different way to upgrade system |
|
|
Update |
Used to upgrade system by u-disk |
Do not power off when updateing, or else NVR can’t restart |
|
Export |
Export current configuration to storage devices |
|
|
Import |
Import configuration from u-disk to NVR system |
|
|
Reset factory setting |
Simple recovery, recover system configuration except Network settings and Cloud password setting |
|
|
Complete recovery, completely restore all system configuration to factory settings |
|
Function instruction: Used to show NVR system information,including product model,device ID,product serial number, software version, hardware version,website, QR code
Operation steps;
Function instruction:Used to upgrade through web server online.
Operation steps:
1. Left click ‘system setting’ in contextmenu or in bottom menu.
2. Left click ‘auto upgrade’ in system setting window, system turns to ‘Auto upgrade’ dialog.
REMARKS: You must ensure that your NVR have connected to the Internet.
Detailed Function List:
|
Function Name |
Function Description |
Remarks |
|
Check |
Used to check whether there’s new version on the remote server |
The dialog shows ‘The current version is up to date’ if there’s no latest version. Besides, The dialog shows the latest version if there’s new software version |
|
Upgrade |
Left click to update to latest version |
Be sure that your NVR have already connected to Internet before upgrade. |
|
Auto upgrade |
Used to upgrade automatically |
|
|
Upgrade time |
Used to set auto-upgrade time |
This setting come into effect only when you Tick off ‘Auto upgrade’ |
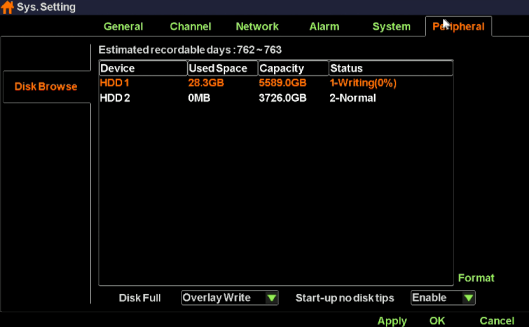
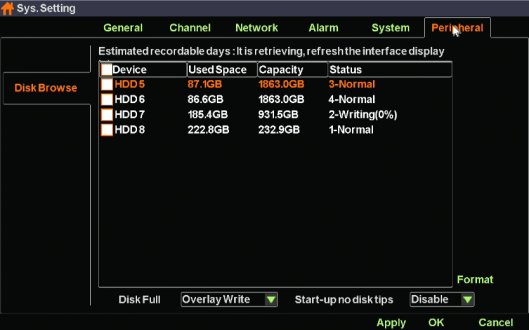
Function instruction: Used to check disk information, HDD formatting
Operation steps:
How to set recording system