XMeye Recording : The DVR needs an internal hard disk drive for recording. Without the hard drive, the system can show live viewing, but can’t record, playback either.
XMeye Recording – How to Set Up 24 Hours Recording
Here are the steps for you:
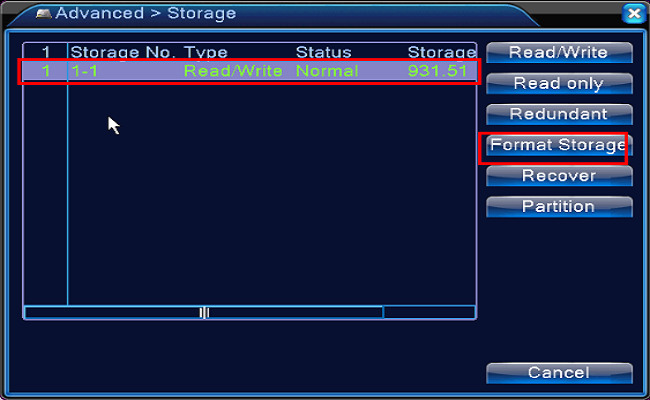
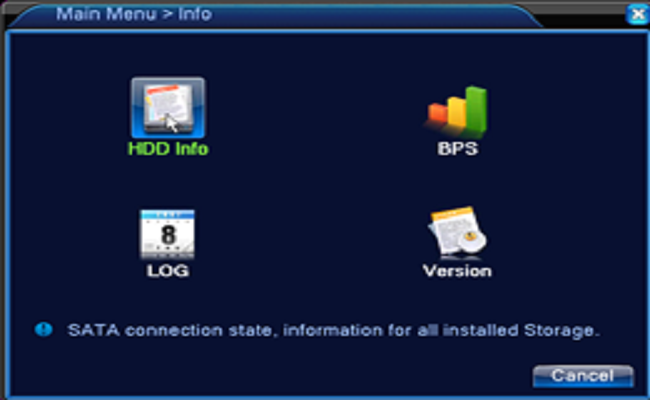
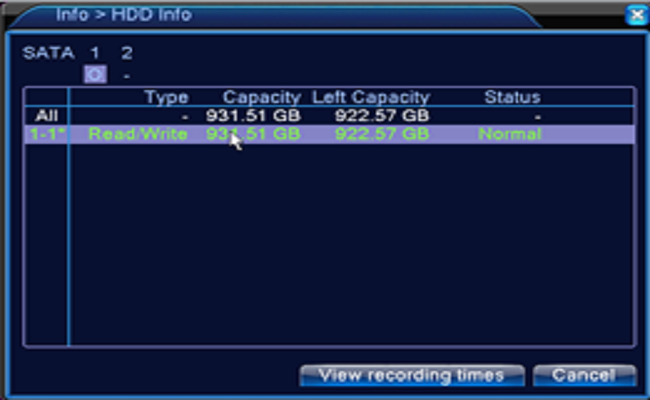
1. Confirm the hard drive installed. Newly installed hard drive needs formatting, please enter the Main Menu — Advanced Settings– Storage to Format Storage. And then go to the Main Menu—Info—HDD Info to check the hard drive status normal or not.
Read Next :
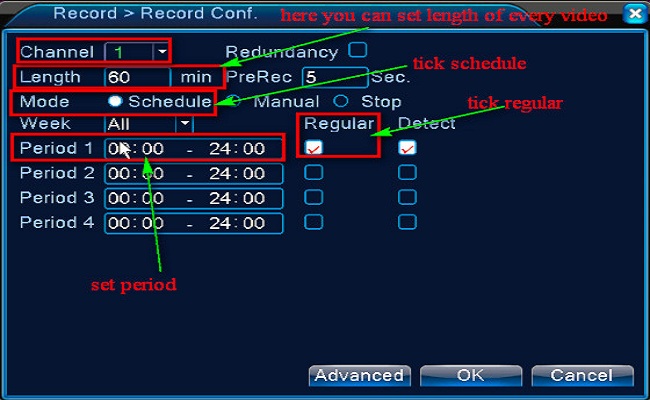
2. Go to the Main menu– Record–Record Conf to set the recording.
Select the channel first.
Set length of every video file
Tick Schedule or Time
Tick Regular
Set the Period you want to record.
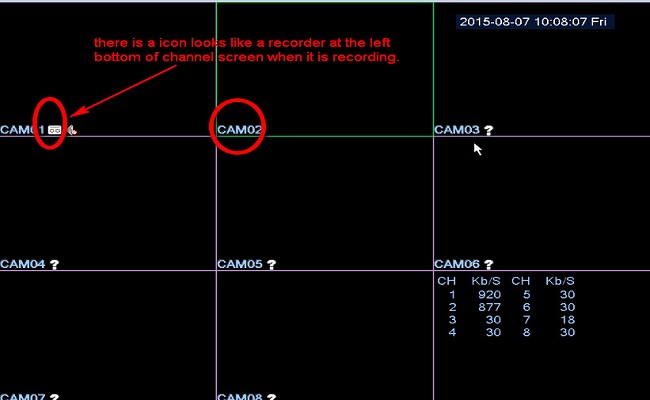
3. Back into the main view mode to check if the camera is recording.
Tips: If you want to back up the recording, please click here to have a try.
XMEye – How to Set Motion Detect Recording on Your DVR?
To set motion detection recording, you need firstly ensure there is an internal hard disk drive in your DVR. Otherwise, the DVR is unable to record videos.
Please go to Main Menu –> Advanced –> Storage to verify the hard drive is available (see the picture below).
Set Motion Detect Recording
Step 1. Go to Record –> Record Conf. Select channel and mode, and tick time period for motion detection.
Note: This step is necessary and cannot be skipped. Please ensure the Manual, Stop, and Regular are not ticked.

Step 2. Tick Enable and select Sensitivity, Region, Record Channel, Buzzer, Send Email in turn, according to your needs. Click OK to save the setting.

Step 3. Click Set to set region. This region is all-selected by default. You can select the region you want for motion detect.
Note: Hold the right button and move the mouse to select the region you want.

Step 4. Click the right button to save the setting. Then the system is available for motion detection recording.
Step 5. Try to playback a video to check if the motion detection has taken effect. The footage in red contains motion detection.
Note: In this example, only 1 camera has been connected to channel 1, so only channel 1 is available for motion detection recording. But if you find you can’t select other channels when more cameras are connected, please refer to this FAQ to fix this problem.
How to Download Videos File from the CMS Software?
1. Please refer to this link below to connect your DVR to computer software.
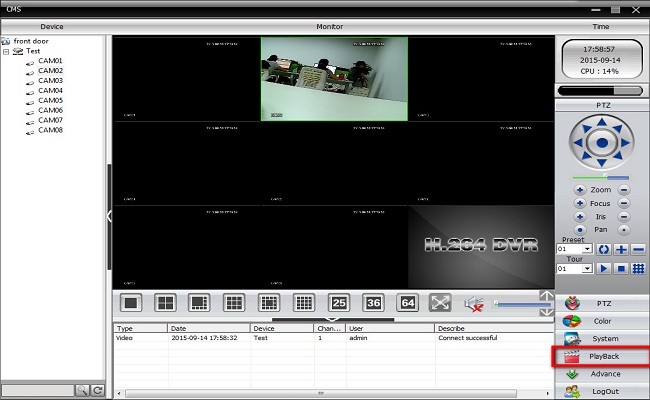
2. Please go to this picture below to tick the ‘Playback’ option.
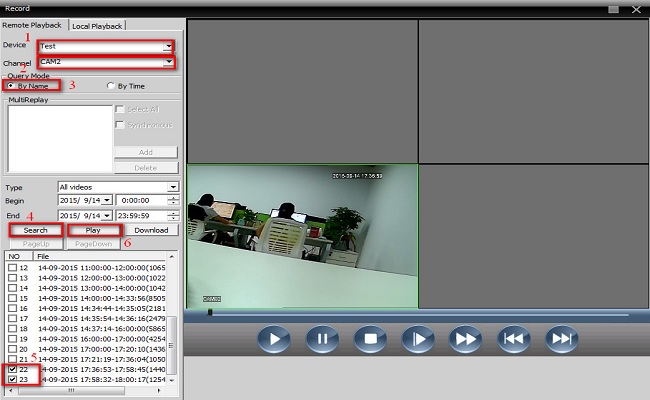
3.Please refer to this picture,step 1,step2,step 3,step 4,step 5,step 6,step 7 to choose the file that you want to download.
4. You can see this picture when you tick the ‘Download ‘ option and then you can choose the Record Type and Record DIR.
5. Finally, you can go to the Record DIR that you choose to check the video file. And if you want to play these videos files, pls use this player software.
https://download.annke.com/document/Computer_Software/Videoplayer.zip
How to Take Recording or Snapshot to Phone’s Storage?
Here is the method of how to connect DVR/NVR on phone app xmeye.
https://help.annke.com/hc/en-us/articles/360000250041-How-to-connect-DVR-NVR-on-phone-app-xmeye-
After app xmeye connects system successfully, you can record or take a snapshot to your phone‘s storage.
Here you can see the video.
You can also download a video in DVR‘S hard disk drive to your phone‘s storage. But the size of the file may be huge.
XMeye – How to Back Up Videos?
The instructions below show how to back up videos to external storage devices.
Step 1. Plug your external USB drive into the USB port of your DVR.
Step 2. Go to Main Menu -> Record -> Backup, then select your USB drive.
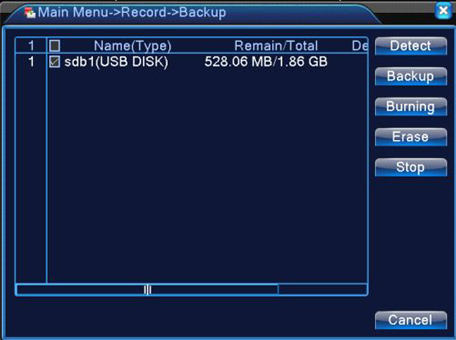
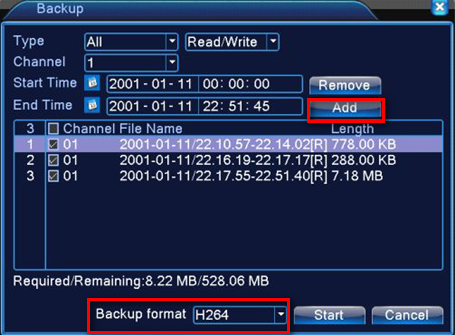
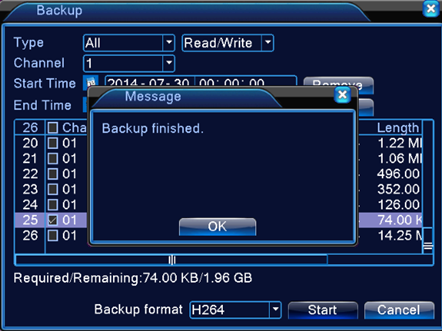
Step 3. Click Backup, and enter the backup interface. Select video files you want to back up according to the type, channel and start time. Then add the selected files, and select Backup Format. Click Start in the end.
Note: AVI is highly recommended for backup format. For AVI videos can be played on most players. While an H.264 player needs to be installed for H.264 videos.
XMeye – How to Cut off Video in Hard Drive?
1. Insert USB hard drive to DVR‘s USB port.
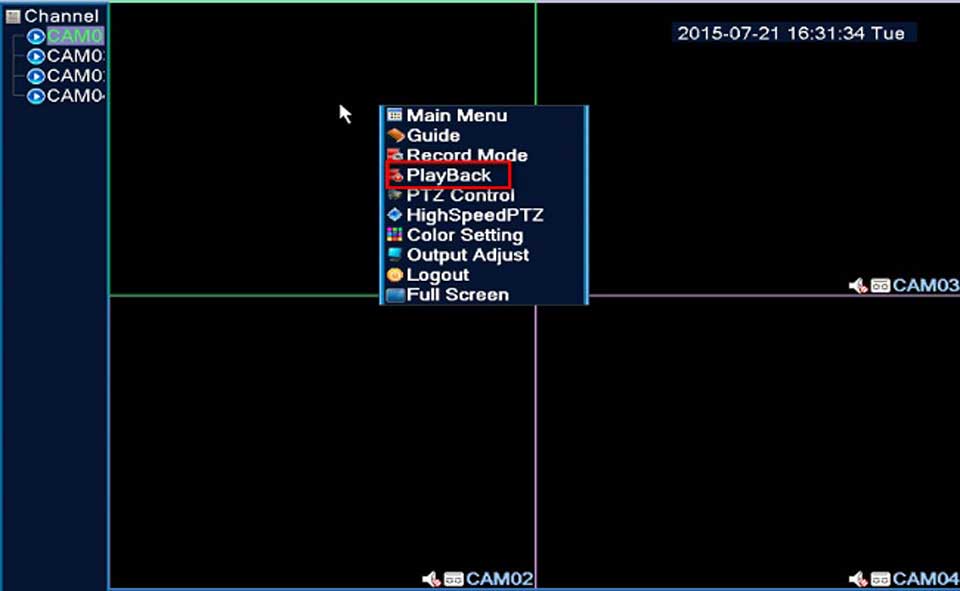
2. Go to play back in the system.
3. Click play to play back video first.
4. Drag the bar to a time where you want to cut off and click scissor to begin cutting.
5. Drag the bar to a time where you want to end and click scissor again to stop editing.
6. Click back up next to scissor icon.
7. Click backup and select the file you cut off just now to back up
If you want to play it on the computer, please use our player. Here is.
https://download.annke.com/document/Computer_Software/Videoplayer.zip
XMeye – How to Record or Take Snapshot to Local Disk of the Computer?
This function doesn‘t need a hard disk drive installed into DVR.
Here is a method to install CMS software into your windows computer and add DVR/NVR to CMS
https://help.annke.com/hc/en-us/articles/360000255301
Here is a player that could play recording file H.264 format.
https://download.annke.com/document/Computer_Software/Videoplayer.zip
There are 4 kinds of recording. manual recording, regular recording(schedule recording), motion detection recording, alarm recording.
- Manual Recording
1. Select the video path first.

2. Right-click image to enable recording. (You can also click snapshot to take a picture)

3. Right-click the image again to disable recording.
4. Go to the path to check and play the recording.

- Schedule(regular), detection, and alarm recording.
NOTICE:
1. There is no port on our DVR to connect an alarm such as a smoke detector. Therefore, alarm recording is not working on the system.
2. If you want the system to get detection recording to your computer‘s disk, you need to enable motion detection first like the picture below.

Here are steps to set up regular(schedule) recording and detection recording.


XMeye – How to Playback All Channels?
1. You can playback video on the monitor.
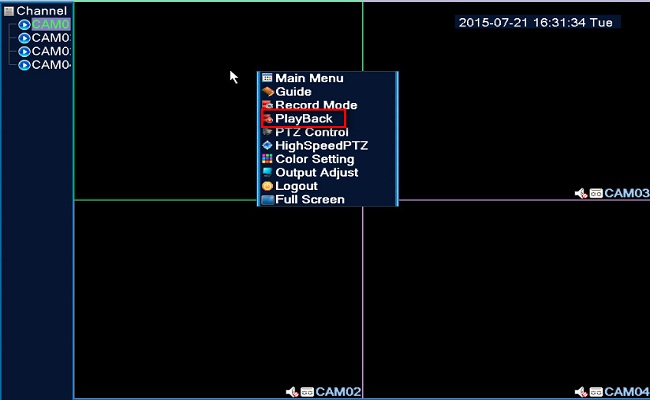
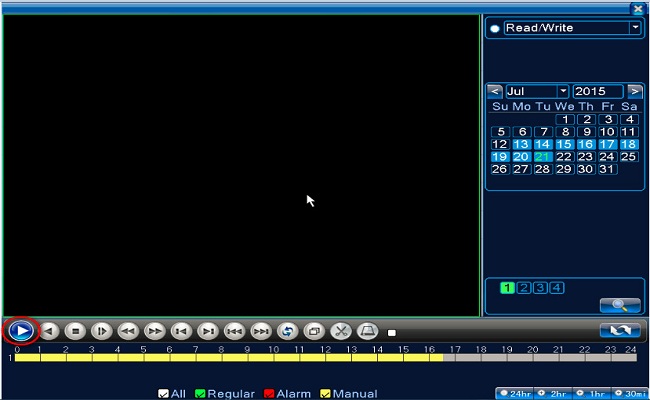
2. You can playback on the phone.
Here is the method of how to connect the system on the phone.
https://help.annke.com/hc/en-us/articles/360000250041-How-to-connect-DVR-NVR-on-phone-app-xmeye-
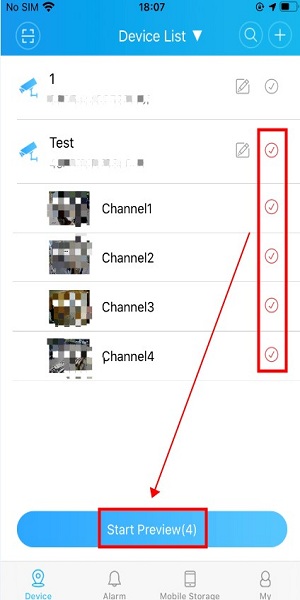
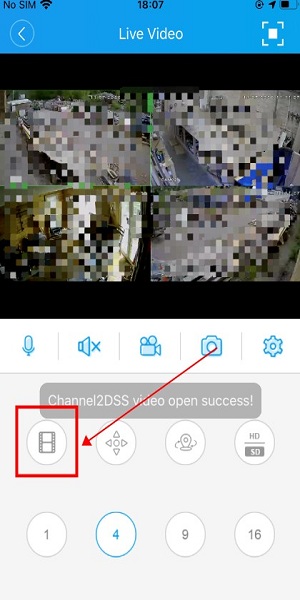
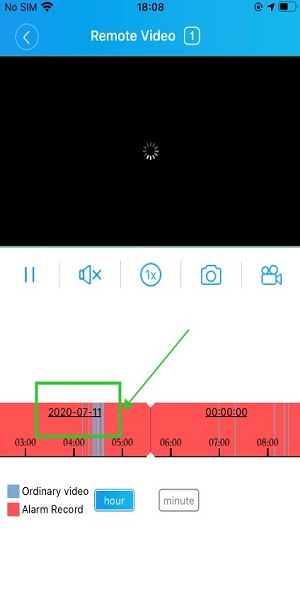
Please follow the below pictures to playback the videos on the phone APP:
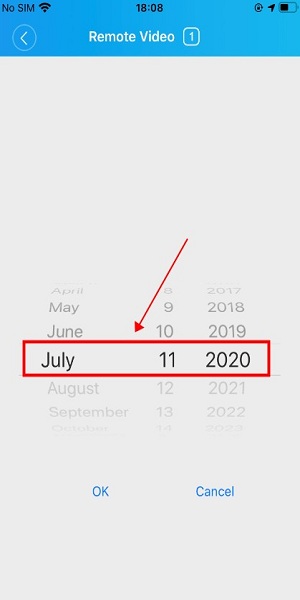
3. You can playback on the computer browser www.xmeye.net.
Here is the method of how to connect the system on www.xmeye.net. https://help.annke.com/hc/en-us/articles/360000249501-How-to-connect-DVR-NVR-on-computer-browser-
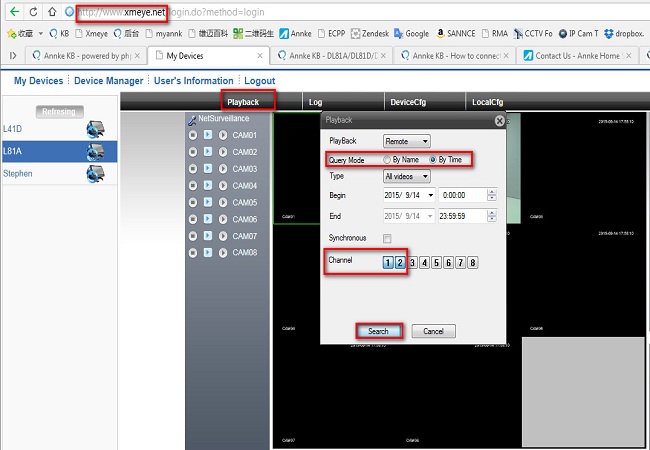
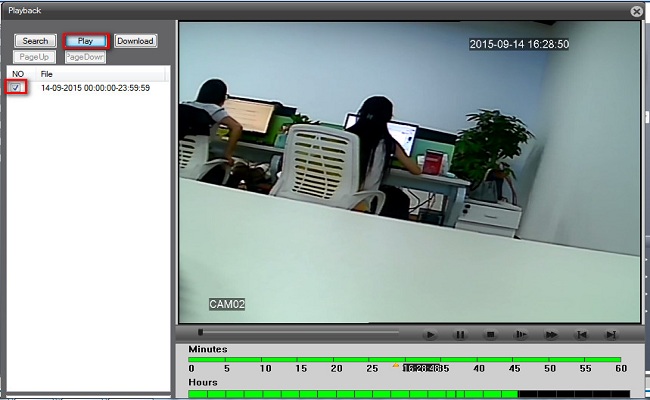
4. You can playback on computer software CMS. Here is the method of how to connect the system to CMS.
