DVR NVR Troubleshooting All Manufacturers, DAHUA NVR TROUBLESHOOTING, Hello dear visitor, in this article we will present you the frequently encountered problems and solutions in DVR NVR and IP Camera security systems. We will explain it through the Dahua recorder, logically many systems are the same. Hikvision Dahua XMeye Uniview or other OEM systems generally work on the same logic.
P2P Troubleshoot
There are following possibilities:
Step by Step Instructions
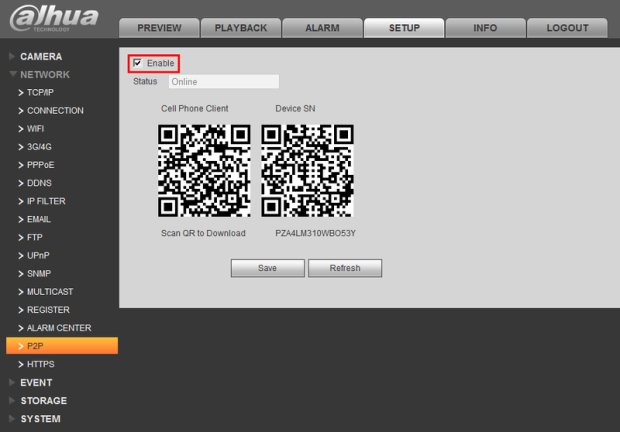
1. Check that, “P2P is enabled under, Main Menu->Setup->Network->P2P
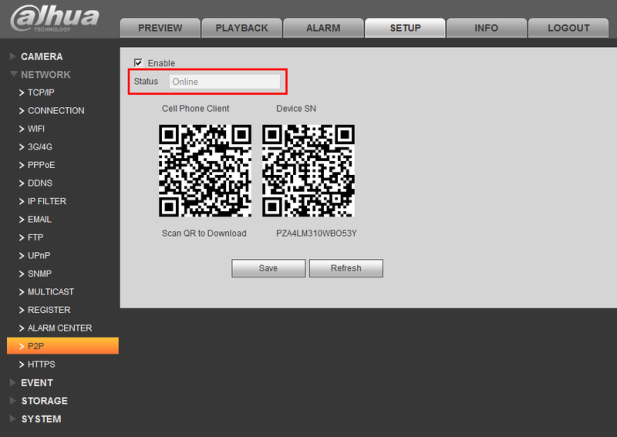
2. Check that the P2P status is, “Online”
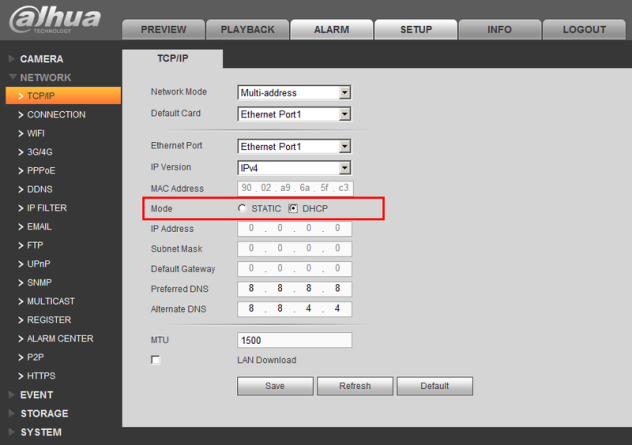
3. Enable DHCP under, Main Menu->Setup->Network
4. Reboot the NVR.
DVR NVR Troubleshooting All Manufacturers
Read Next : Dahua Camera Troubleshoot Guide
Browser Troubleshoot
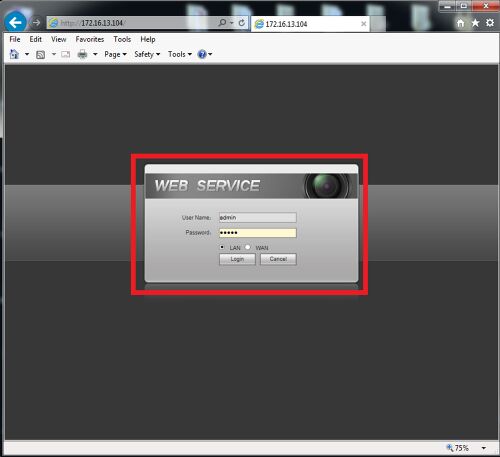
Unable to Login from Web Browser
Step by Step Instructions
1. Delete any previous version of Web Rec. How to Delete Web Rec
2. Make sure you are using Internet Explorer (Safari on OSX). Not Edge, Chrome, Firefox, or any other browser.
3. Configure Internet Explorer’s security settings. How to Configure Internet Explorer’s Security Settings
4. Ensure no Malware or Viruses are installed on the computer.
5. Set as a trusted site.
6. Change credentials from Recorder if credentials are invalid.
7. Close out IE and reboot PC.
8. If accessing outside of network, make sure device is set up for remote viewing such as DahuaDDNS or port forwarding.
9. Ensure you have ” http://” in front of the domain name or IP address.
10. Set IE settings to default condition. Please see below.
11. If none of the above will work, use SmartPSS.
Network connection is not stable.
Explanation:
Solution:
The video is not fluid when I view in multiple-channel mode from the client-end.
There is only mosaic no video when preview or playback video file remotely.
There are following possibilities:
How to perform an internet speed test
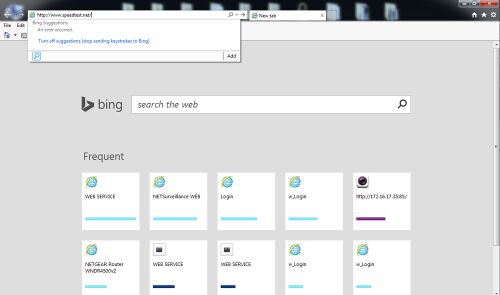
1. To check your Internet connection please go to http://www.speedtest.net/
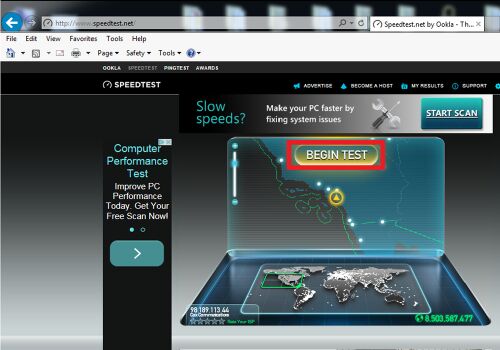
2. Click Begin test, and let the test run
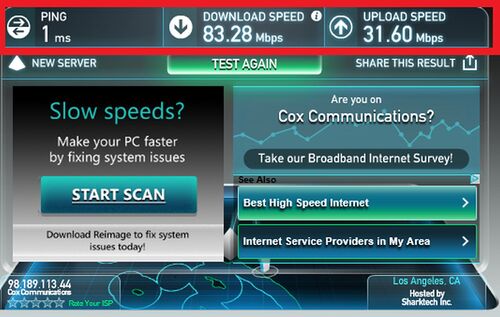
3. Compare your results next to your required internet specifications for your device(s)
System Bandwidth
You can monitor how much bandwidth the system is using. You can do this by following the the steps below.
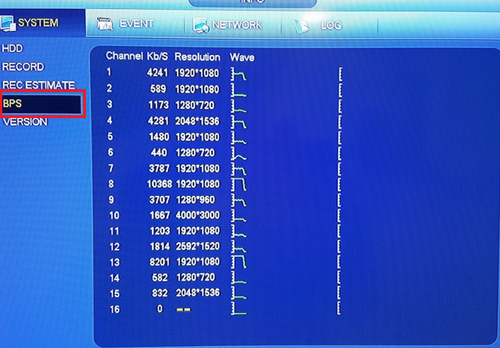
1. From the Main Menu under Info click on “System”.
2. Click on “BPS”. Here you can see how much data each camera is using.
How to create and install a certificate
When I login via HTTPS, a dialogue says the certificate for this website is for other address
You will need to re-issue a certificate with the correct address, and then get the certificate authenticated.
When I login via HTTPS, a dialogue says the certificate is not trusted
You will then need to download the certificate and install it on your client side.
When I login via HTTPS, a dialogue says the certificate has expired or is not valid yet
Step by Step Instructions
1. Log into your NVR via the Internet Explorer Browser.
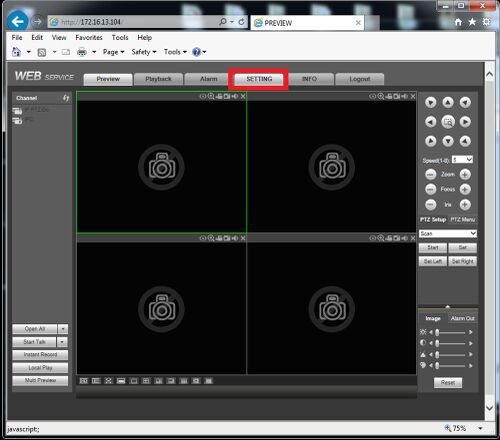
2. Select Setting
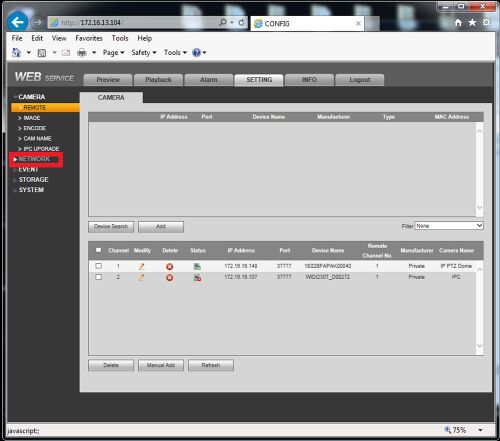
3. Select Network
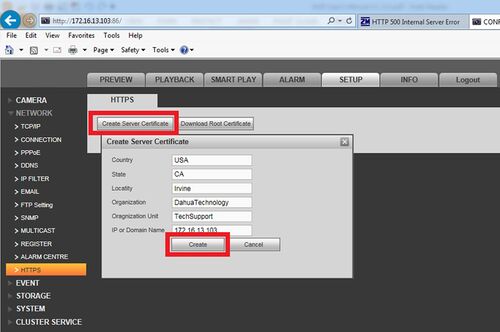
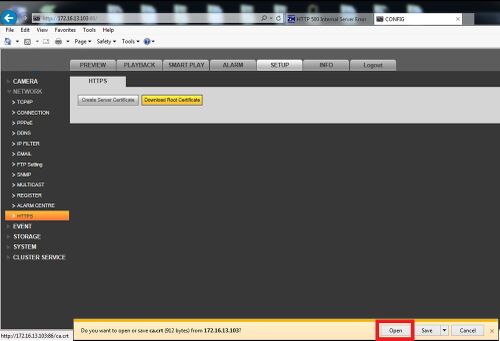
4. Select HTTPS on the left hand column under Network. Then select “Create Server Certificate”, and populate your server Certificate with your country code, state, location (city), the name of your organization or business, the name of the department, and the IP or domain name you wish to operate under. The information here will be used to create the SSL certificate to be authorized.
5. Now Select “download Root Certificate”, and click open when the prompt pops up on your browser.
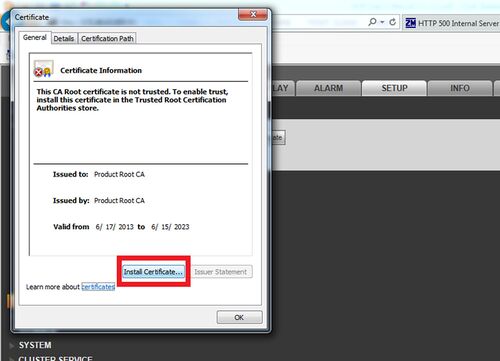
6. Click Install Certificate
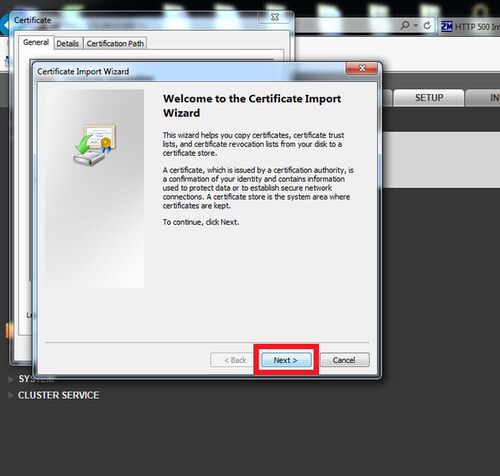
7. Now click next
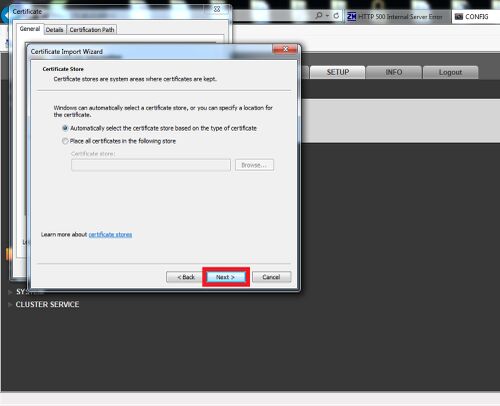
8. Now click next, unless there is a directory that you want to store the certificate in on your client computer
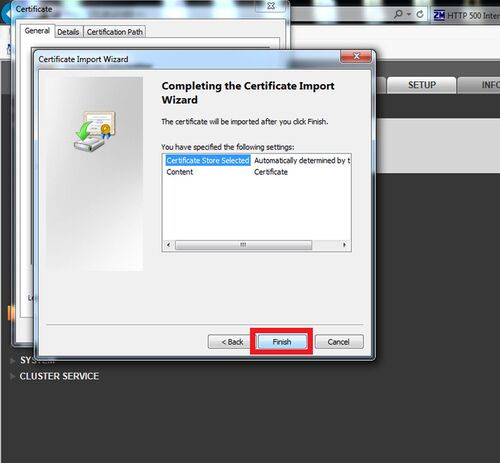
9.Now Click finish
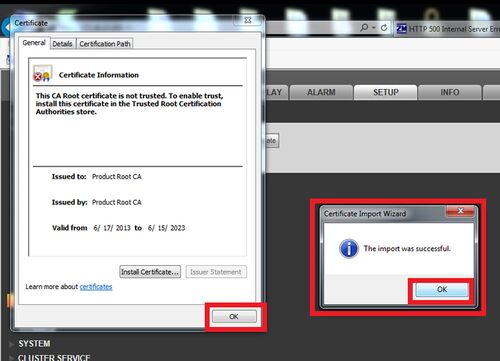
10. There should be a prompt saying “The import was successful”
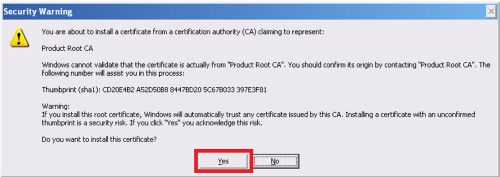
11. After the security certificate is installed go to your HTTPS page and there should be a security promp, click “Yes”.
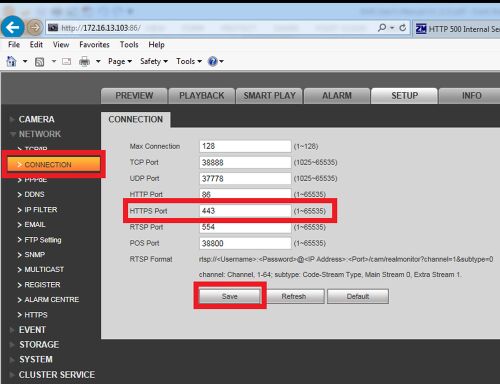
12. Pay attention to the HTTPS port number when setting up port forwarding for your host server (your NVR)
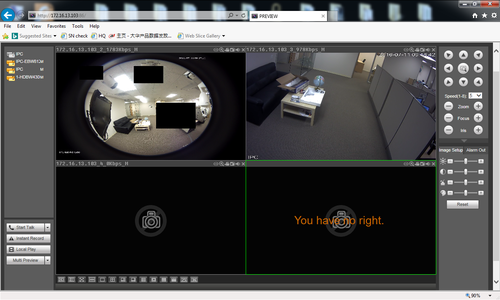
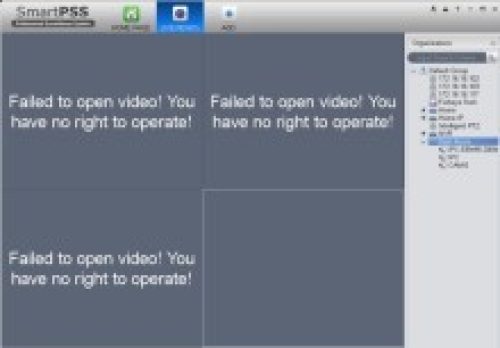
Failed to Open Video! You Have No Right To Operate!
Prerequisites
Video Instructions
Step by Step Instructions
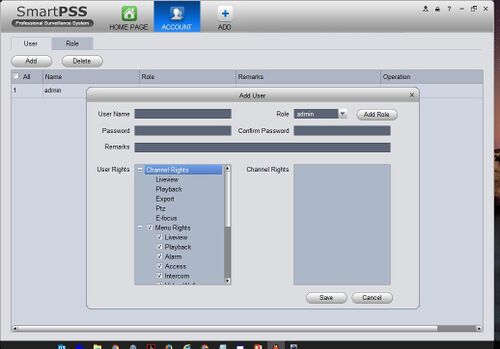
1. Log into with an administrator account.
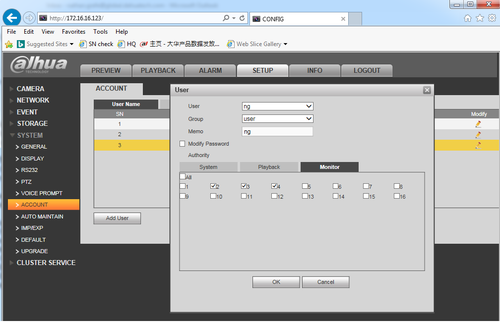
2. Go into the Accounts menu on your system and edit the specific profile you are having the error with.
3. Under the Monitor tab enable the camera channel with the error and click save.
4. Log into the modified account, and view the camera channel with the error.
Internet Explorer Troubleshoot-“Signature is Corrupt or Invalid”
Description
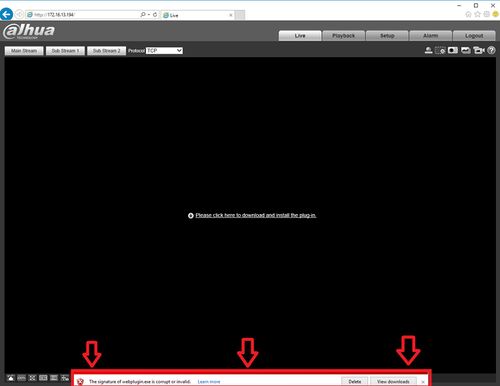
If you see this warning (see the image below) when trying to download a plugin for a recorder or IP camera, this is your antivirus trying to block a our unsigned (i.e. WHQL) plugin. Installing this plugin will allow the camera’s feed to stream in IE.
Prerequisites
Step by Step Instructions
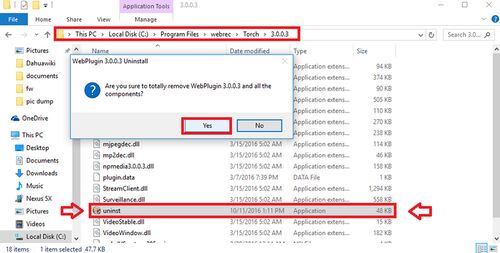
1. Clear your WebRec Folder by navigating to the program files/webrec folder and also program files(x86)/webrec folder and double clicking the uninstall icon to uninstall the plugin.
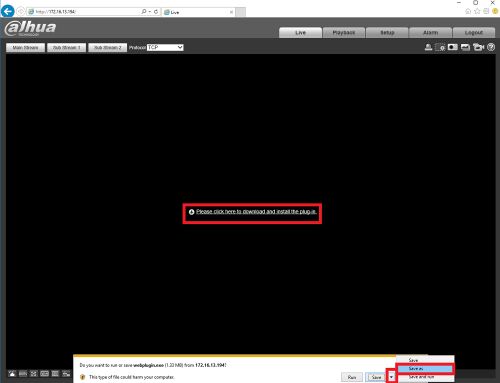
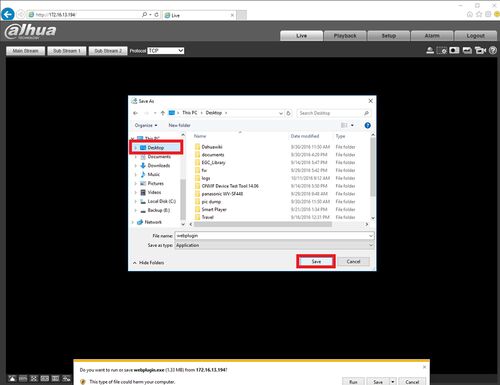
2. Once uninstalled open Internet Explorer and enter the IP address of your device into the URL area of the browser and hit enter. Log into the camera, or once prompted to download the plugin select the pull down menu button next to “Save”, now select “Save As”.
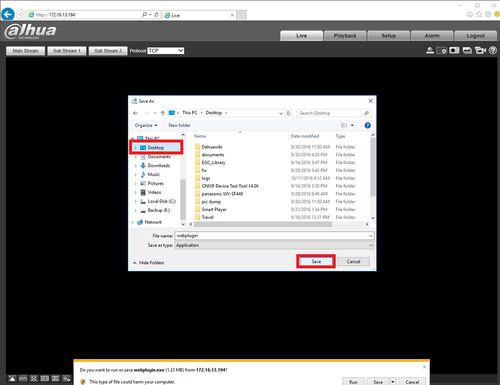
3. Navigate to your desktop so you can save the program and find it easily.
4. Now right click the program and select “Run as administrator” to install. You might need to reload the IE browser webpage once the plug-in or program has installed to get the video stream to work.
DDNS registration failed or can not access the device domain name.
DDNS (Dynamic DNS/DynDNS) is a method of automatically updating a name server in the Domain Name System (DNS), often in Not Real Time, with the active DDNS configuration of its configured hostnames, addresses or other information.
If DDNS is not working properly please try to:
1. Check the device to see if it is connected to the network:
2. Verify that the device has acquired and IP address via DHCP or that a static IP has been assigned.
3. Ensure that you can connect to the system on via the local network:
4. Try to access the system from another device on the network e.g. Try to open the web interface of the device from a web browser on your local network.
5. Check the corresponding protocol of the DDNS is enabled:
6. Log into the DVR/NVR/CVR and navigate to the “Network” menu then look for the DDNS option and check the box to enable the service. After the service is enabled you will need to fill in the required informwation i.e. DDNS Type, Host IP Port (1~65535) Domain Mode Domain Name and Email Address if applicable
7. Check the DDNS credentials at the DDNS site and menu of the system:
8. Please confirm that log in information matches on the Dynamic DNS platform that you are using and also in the DDNS section of the recorder.
9. Default Google DNS server is 8.8.8.8, 8.8.5.5.
10. Use different DNS provided by your ISP.
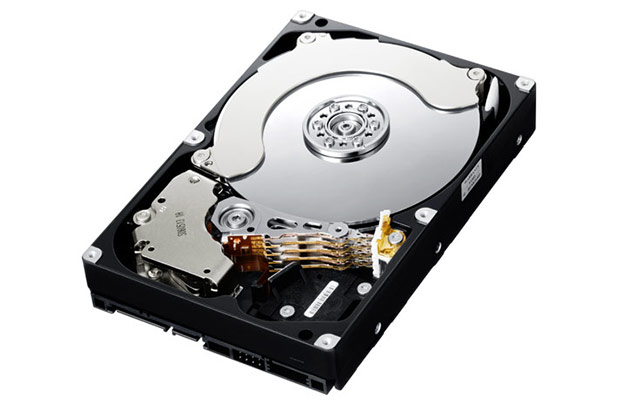
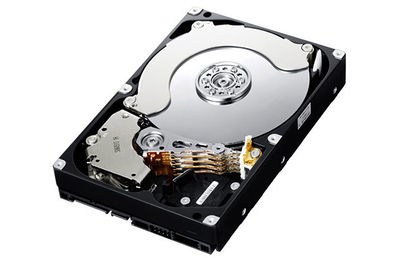
System can not detect hard disk.
There are following possibilities:
Solutions
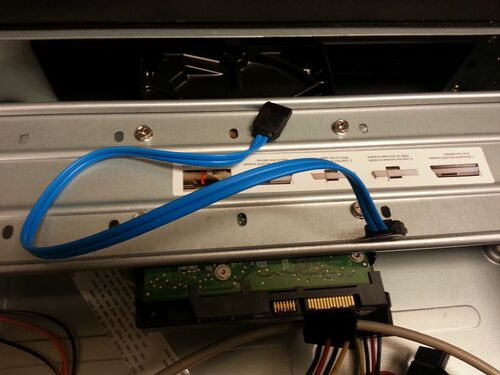
SATA Cable
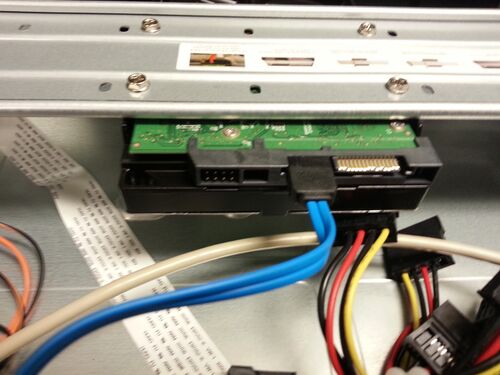
SATA into Harddrive
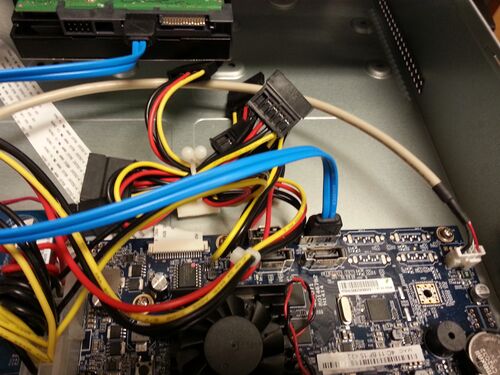
SATA from motherboard to Harddrive
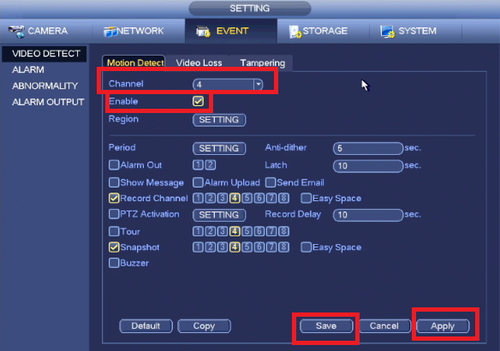
Motion detection function does not work
There are following possibilities:
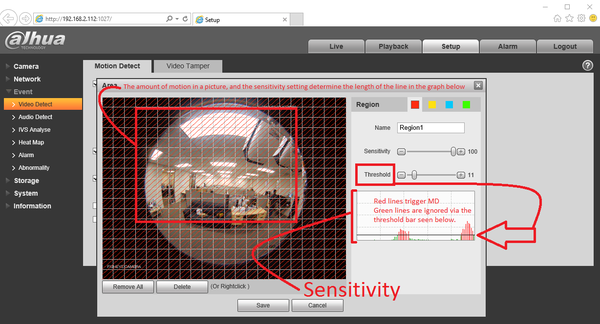
1. Sensitivity is too low, or Threshold too high.
2. Most third-party cameras will not have the full capabilities, like motion detection, to work.
3. Check if firmware of Recorder and IP camera is current.
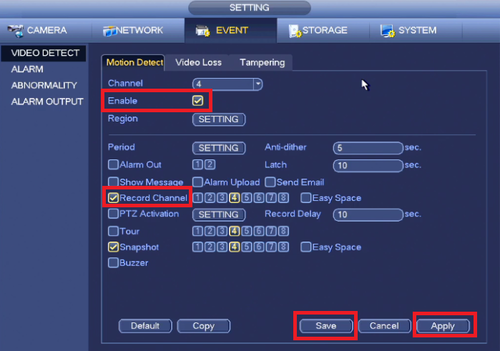
4. Ensure motion detect is enabled on each camera, applied and saved.
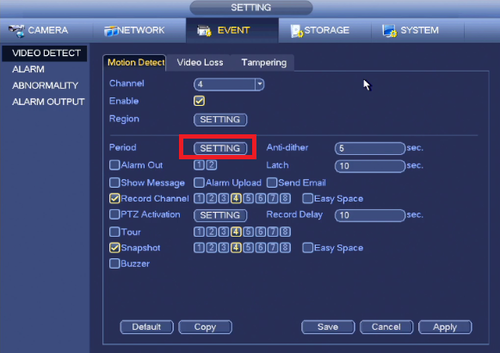
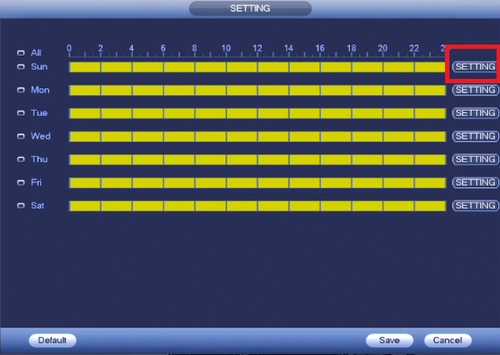
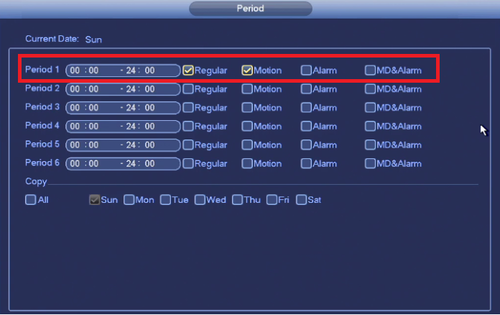
5.Period setup is not correct.
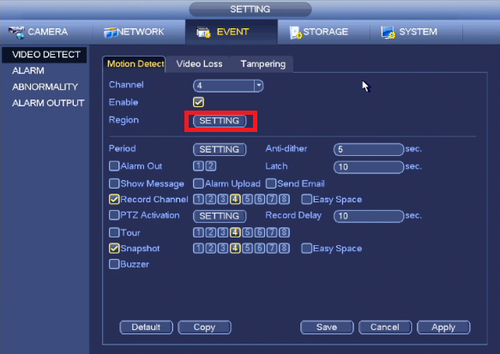
6. Motion detection region setup is not correct.
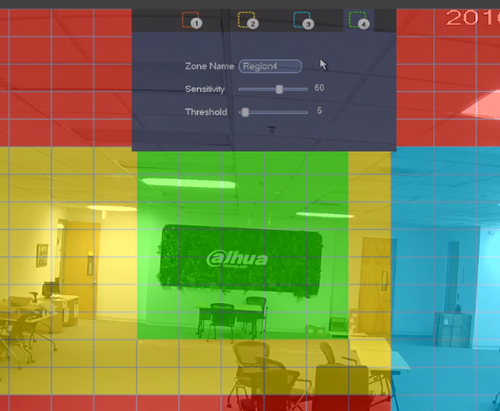
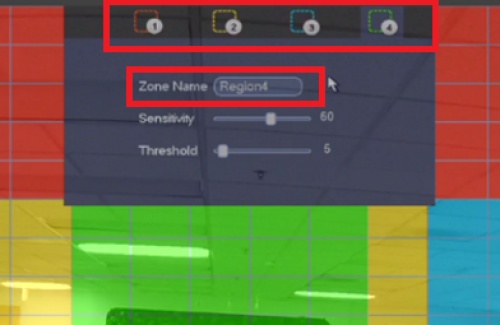
Here on the region settings you have a total of 4 regions you can set for each camera view. In each region you can set the sensitivity and threshold at different levels.
The regions are numbered reigion 1 – 4. Each numbered region has a corresponding color as follows:
Region 1 is red
Region 2 is yellow
Region 3 is blue
Region 4 is green
Here is an info-graphic explaining sensitivity and threshold:
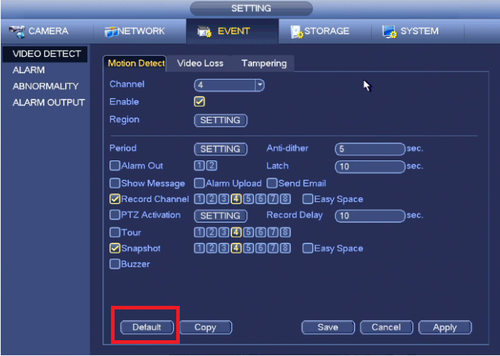
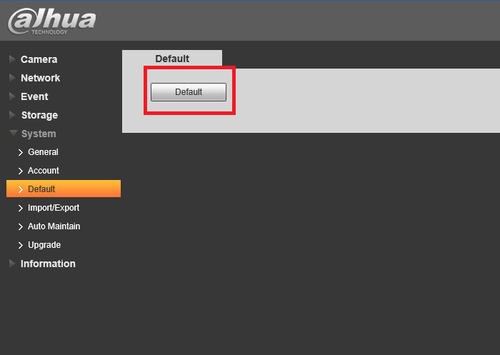
7. Try defaulting camera settings.
8. If it is an IP Camera login in via web and try defaulting from there to see if defaulting fixes the issue.
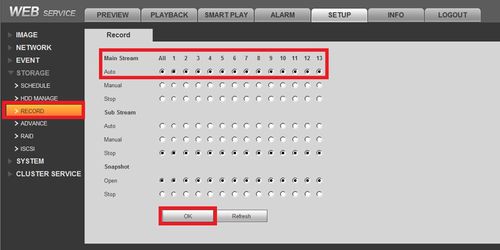
9. Ensure enable and record is checked off applied and saved.
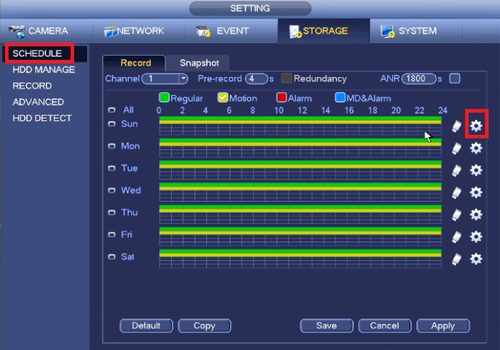
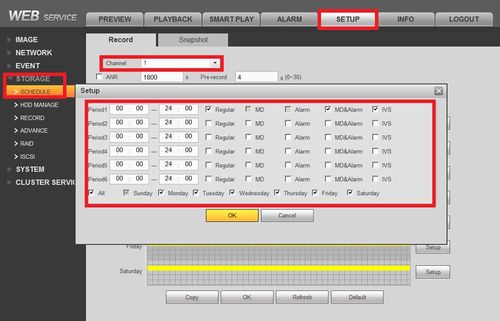
10. Ensure the schedule is set for motion recording.
Unable to Playback Recordings
There are following possibilities:
HDD
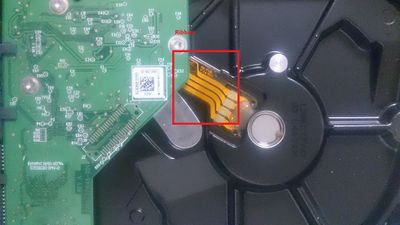
Ribbon
Alarm signal can not be disarmed
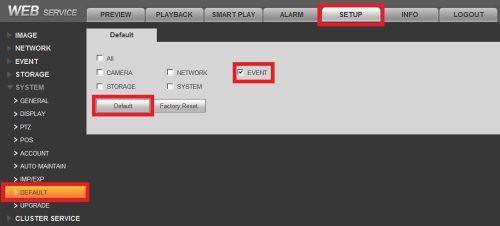
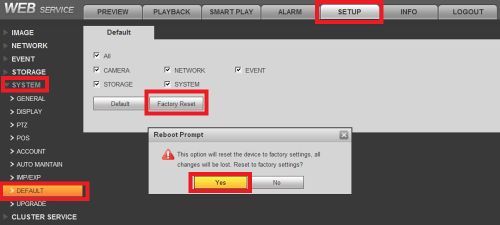
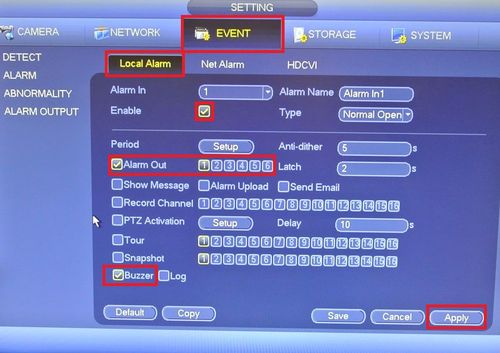
1. To begin troubleshooting please reset all events by logging into your NVR/DVR/HCVR/Tribrid and going to Setup>System>Default and check only the event box and select default. This will clear all of your event data for all cameras connected on this NVR/DVR/HCVR/Tribrid and on the connected IP Cameras themselves. To be specific this feature will disable all Video Detect, IVS, Face Detect, Audio Detect options on the camera. If this fixes your alarm signal then your alarm setup on the camera was not setup correctly. Don’t forget that if you were using motion detect for recording you will need to re-enable these features.
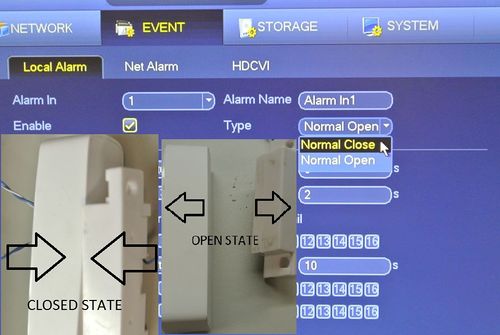
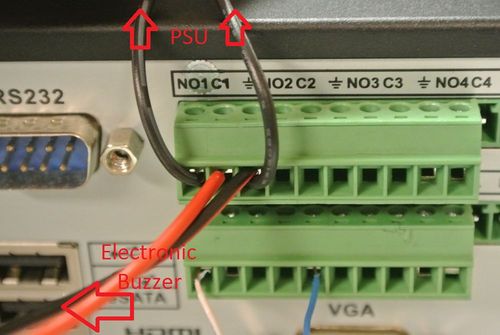
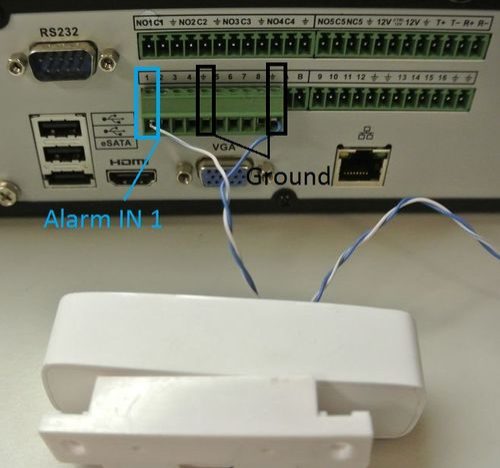
2. If this didn’t fix the problem then you need to check the wiring on the back of your NVR/DVR/HCVR/Tribrid for your alarm input and output. Alarm inputs are set to NO (normally open) by default. In case you have a sensor that is open all the time, you might want to set the input to NC (normally closed). For an in-depth guide on how to wire and setup physical alarm inputs and outputs please visit:
How To Connect Electronic Buzzer Tutorial
3. If this didn’t fix the problem, perform a factory reset on your NVR/DVR/HCVR/Tribrid Recorder in Setup>System>Default, click factory reset, and then yes.
Alarm function is null
If you are experiencing a nonfunctional or non working alarm then you might want to consider that the alarm was setup incorrectly.
Resources for Alarm Systems
Possible Problems:
Here are also some possible problems that may have occurred upon setup:
Please Be Advised
Sometimes it is best to call the engineer who setup your alarm system if you do not know what you are doing, as tampering with some systems can set off subsequent systems.
Troubleshoot/NVR/Display Troubleshoot
Namespaces
Page actions
The displayed video is not full in the monitor.
Please do the following:
1. Check your physical connections from the system to the monitor.
2. Check your aspect ratio.
3. If a VGA connection, ensure the screws are tight.
4. For the VGA connection, 25 feet or less is recommended for high resolution and 50 feet for lower resolution.
5. If a DVI connection, also ensure the screws are tight.
6. For the DVI connection, Up to 15 feet at high resolutions (above 1280×1024), or up to 50 feet at lower resolutions (1280×1024 and below)
7. If a HDMI connection, 1080p monitor is recommended.
8. For the HDMI connection, less than 50 feet is highly recommended with 25 feet or less is preferred.
9. If a DP connection, make sure the monitor is at least 1080p.
10. On the monitor check the current resolution setup. If the current setup is 1920*1080, then you need to set the monitor resolution as 1920*1080 or 1080P capable.
11. Monitor is incapable of displaying the device recorders resolution output.
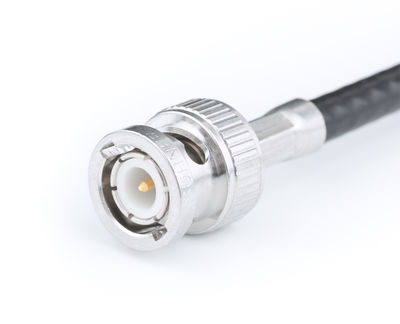
Coaxial with BNC connector
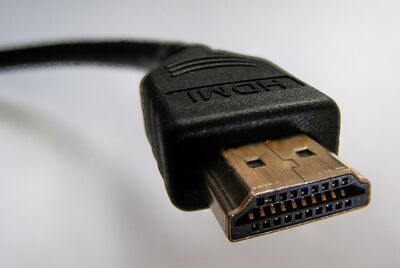
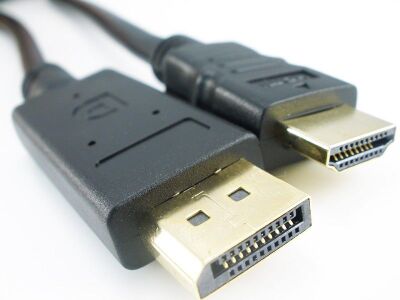
HDMI (High-Definition Multimedia Interface) Connector
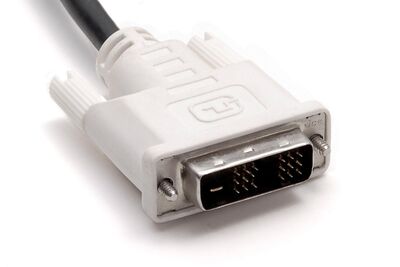
DVI (Digital Visual Interface) Connector
DP (Display Port) Connector
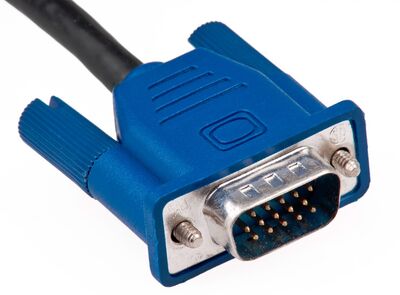
VGA (Video Graphics Array) Connector
Errors Found in Log
Whenever the DVR reboots an entry is created in the Log, Information>Log. In the log the entry will list “Reboot with flags” or “Reboot Symbol”. It will show a code telling you why the camera rebooted. Please see the list below:
Boot Codes
Troubleshooting the codes
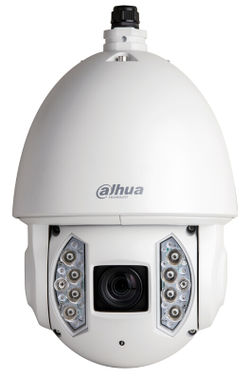
PTZ Troubleshoot
Please Note: IP and HD-CVI PTZs do not require an RS485 cable. Controls are sent over the RG59 or CAT5 cable.
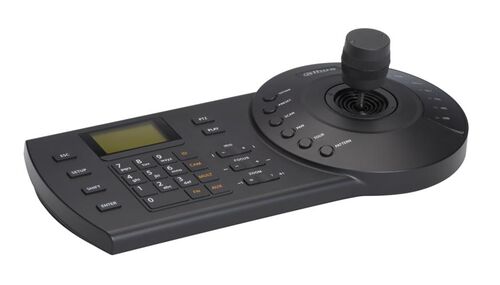
Keyboard can not control NVR.
Related Links
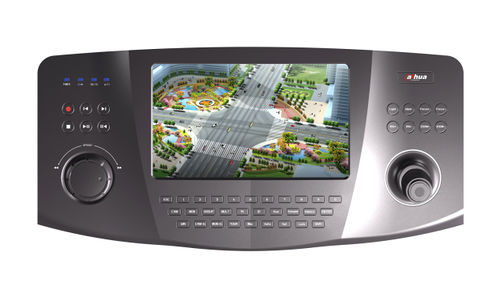
Network Keyboard – NKB1000, DH-KBD1000, DH-KB1000
How to Setup NKB1000 over Network
How to Setup NKB1000 via RS232
How to Setup NKB1000 via RS485
How to Setup NKB1000 via USB and SmartPSS
Keyboard can not control NVR
NKB1000
NKB3000
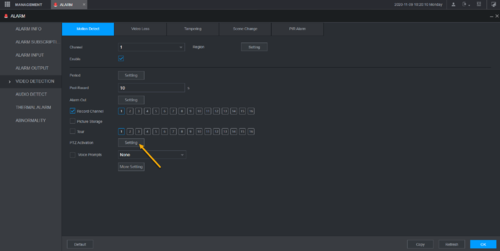
Motion Detect PTZ Activation
Step by Step Instruction
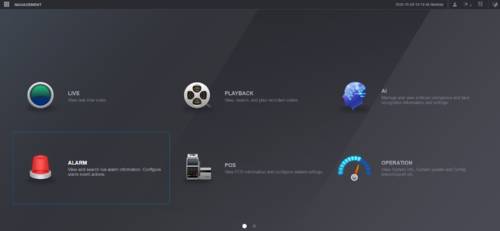
1. Login to Dahua recorder from local system interface.
2. Go to Alarm.
3. Go to Video Detection > Motion Detect.
4. Select the camera channel that you wish to call PTZ camera when motion triggered.
5. Click on “Settings” button under PTZ Activation.
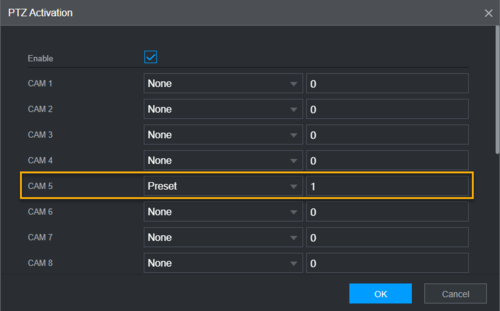
6. Select the PTZ camera channel and specify the preset number. Then Click OK.
7. Click OK again to save the settings.
Disable Audio Recording
Step by Step Instruction
1. Login to Dahua recorder from local system interface.
2. Under Settings, click on Camera.
3. Go to Encode.
4. Select the camera channel.
5. Click on More.
6. Click on the toggle to turn off Audio. Click OK.
7. Click Save.
Disable Audio Dahua IPC
Step by Step Instruction
Step by Step Instructions
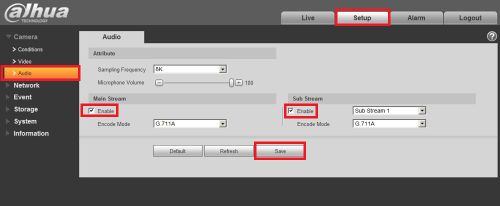
1. Login to Dahua NVR Web GUI using Internet Explorer.
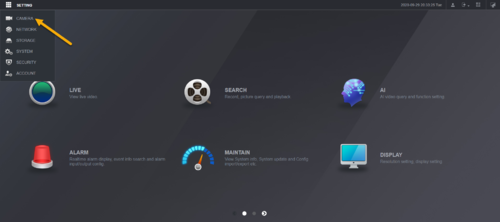
2. Click on Settings > Camera.
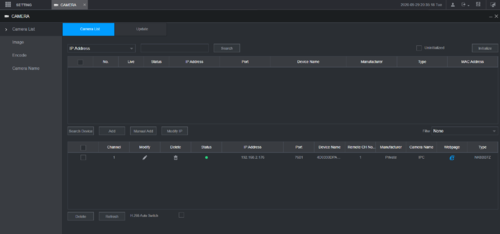
3. Click on Camera list (Some recorder will label it as Registration)
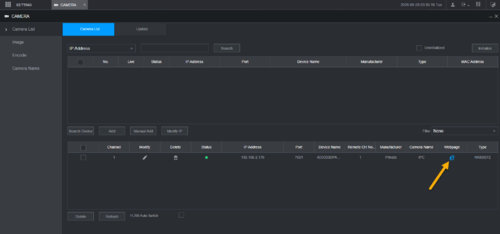
4. Find the camera channel you want audio to be disable, click on E Internet Explorer icon.
5. It will take you to the login page of Dahua IP Camera. Login with Camera credential.
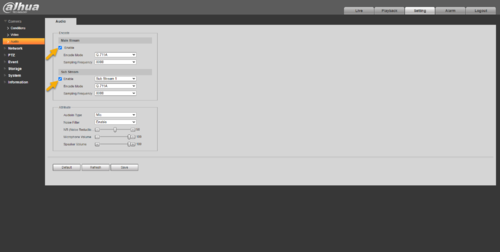
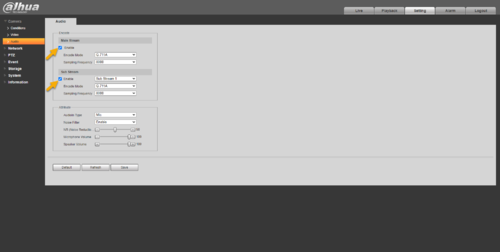
6. Go to Settings > Camera > Audio. By default the Audio settings is enabled.
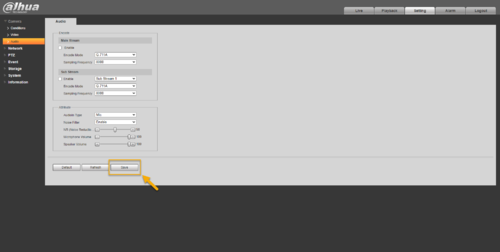
7. Click on the checkmark to uncheck on both main and substream.
8. Click Save.
No Audio from Live Feed
There are following possibilities:
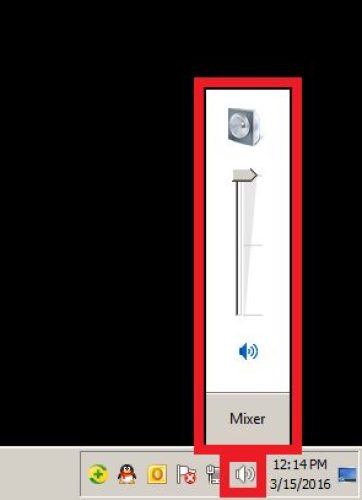
1. Make sure your audio on the computer or television is enabled and working by playing music or watching a video with audio online. You should see this audio meter change when playing music or video on the computer/television.
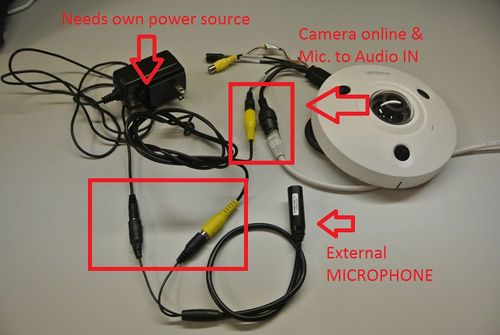
2. Once you have confirmed your audio is working on your speaker, and if you still can’t hear from your Live Feed, check your connections. If you are using an external microphone that plugs into the camera, please make sure you are supplying power to since the camera does not. See picture below:
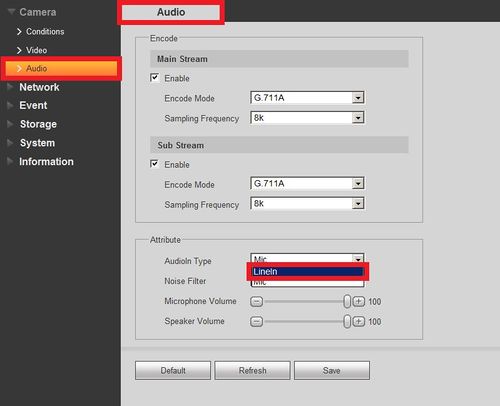
3. If your connections and power are in order but you still cannot get audio from your live feed, log into your IP Camera or NVR and change the following settings.
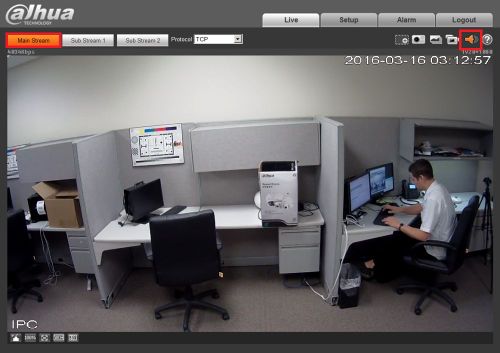
4. If you are accessing your audio feed from a computer also make sure you have the speaker symbol enabled to enable audio from the Live Feed.
There is Audio from Live Feed, No Audio During Playback
There are following possibilities:
1. Make Sure your camera with a microphone is working via live stream, please follow the NoAudio guide for details.
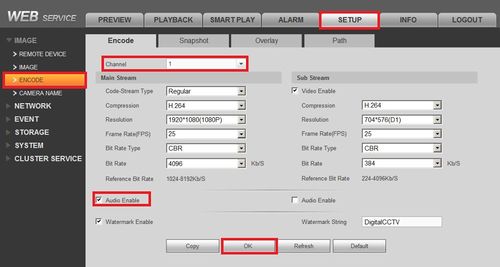
2. After ensuring you are receiving an audio feed, log onto your NVR and make sure your encoding setup is correct (Setup>Image>Encode>) and make sure your are on the right channel where the camera has a working microphone. Now make sure audio is enabled for either or both the Main Stream and Sub Stream (whichever you are recording on)
3. Also make sure your camera is scheduled to record during specified operation.
4. Also make sure your camera is set to record
5. Now playback a recording of a camera that had picked up audio, you can also simulate this by making noise by the microphone and playing that segment back. Also make sure that the Volume button is not on mute and is turned all the way up during playback.
HDMI Troubleshoot
Namespaces
Page actions
There is no HDMI output.
Video Loss 1 Camera
Namespaces
Page actions
Video Loss 1 Camera
There are following possibilities:
Video Loss All Cameras
Namespaces
Page actions
Video Loss on Multiple Cameras
There are following possibilities:
Troubleshoot Blurry Camera
Namespaces
Page actions
Camera Feed is Blurry or Distorted
There are following possibilities:
Troubleshoot Blurry Camera Playback
Namespaces
Page actions
Video is distorted when searching local records.
There are following possibilities:
Explanation:
1. If Video quality setup is too low then reconfigure video quality setup.
2. If Program read error, bit data is too small. There is mosaic in the full screen. Please restart the DVR to solve this problem.
3. If HDD data ribbon error then replace ribbon.
4. If HDD malfunction then replace HDD.
5. If DVR hardware malfunctions then replace hardware.
Remote control does not work.
There are following possibilities:
Explanation:
1. If Remote control address is not correct then find the correct address.
2. If Distance is too far or control angle is too small then shorten the distance or fix control angle.
3. If Remote control battery power is low then replace battery power.
4. If Remote control is damaged or DVR front panel is damaged then replace remote control or DVR front panel.
System does not boot
There are following possibilities:
NVR Randomly Rebooting or Shutting Down
Issue: NVR Randomly Rebooting or Shutting Down
There are following possibilities: Explanation:
1. If Input voltage is not stable or it is too low, then change the power supply and cable.
2. If HDD malfunction or something wrong with the ribbon, then replace the HDD or the ribbon.
3. Button power is not enough, then add more button power.
4. If Front video signal is not stable then check and adjust front video signal.
5. If Working environment is too harsh, too much dust then clean it.
6. If Hardware malfunction then replace hardware.
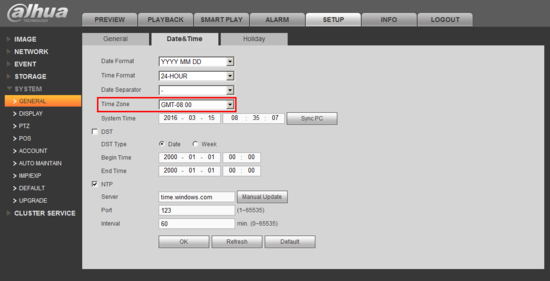
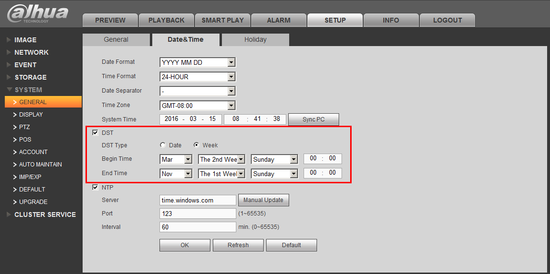
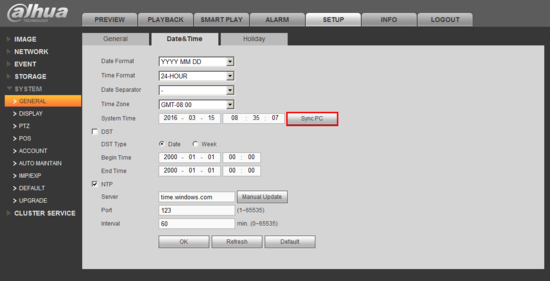
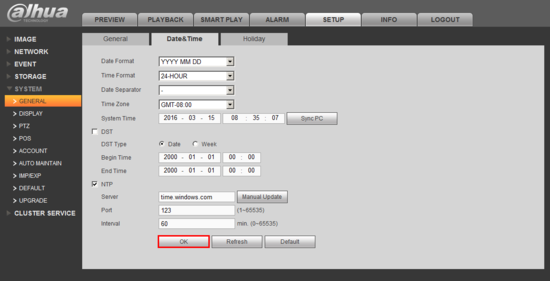
How to set the date and time
Time display is not correct.
There are following possibilities: Explanation:
Step by Step Instructions
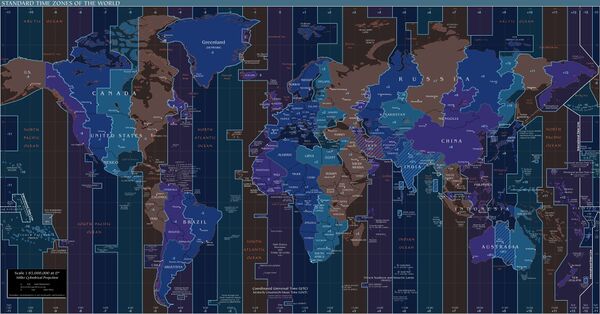
1. Make sure the “Time Zone” is set correctly.
GMT stands for Greenwich Mean Time.
2. Setup DST, if applicable.
3. “Sync PC” if all else fails.
4. Click, “OK” to save your changes.
Burn Error Troubleshoot
Namespaces
Page actions
Burn error /USB back error.
Explanation:
1. If Burner and NVR are in the same data cable, then separate them.
2. If System uses too much CPU resources. Then please stop record first and then begin backup.
3. If Data amount exceeds backup device capacity which may result in burner error. Then please delete data.
4. If Backup device is not compatible, please change backup device.
5. If Backup device is damaged, please change backup device.
How to Change Camera Order of Connected Cameras
Description
This allows you to change camera order on the view.
Prerequisites
Video Instructions
Step by Step Instructions
1. Look at the order the cameras were added and keep track of the IP’s of the cameras you want to re-arrange.
2. Delete the cameras and add them in that specified order.
1. Keep track of what channels you want to switch. The recorder’s channels are assigned by the numbered BNC ports on the back of the unit. Labeling the channels might help when switching the ports around to the specific order you want.
2. Unplug the BNC connectors and move the correct camera to the correct channel.
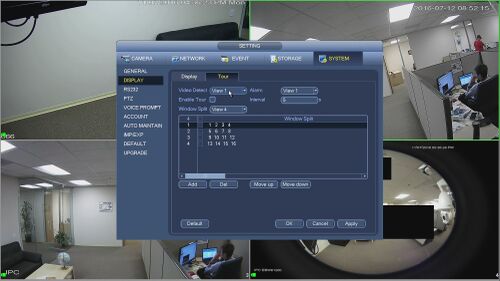
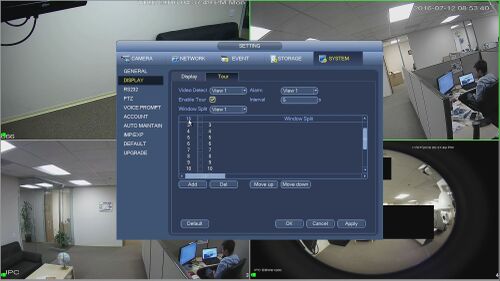
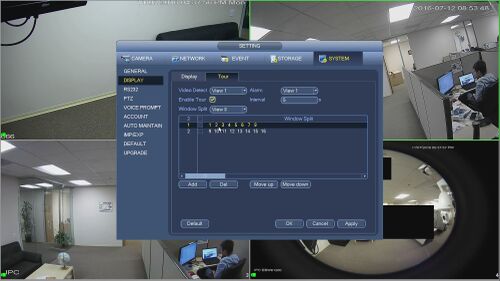
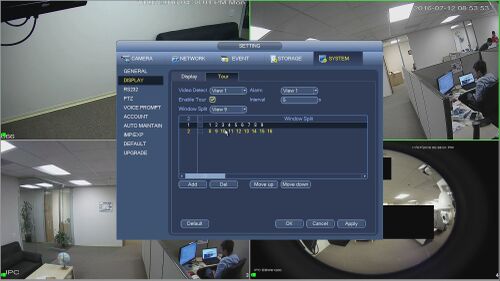
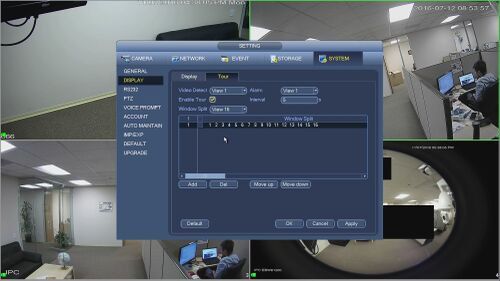
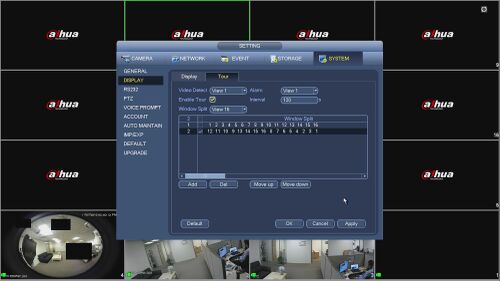
1. The cameras are prioritized by the BNC ports for the first set of channels. If you want the IP channels to appear first you will need to setup a tour mode on only one tour setting. Open the menu on the NVR and select SYSTEM(under SETTING)->DISPLAY->TOUR
2. Check the Enable Tour box.
3. Make sure all of the Window Split Views (1,4,8,9,16) are left unchecked, otherwise this will initiate a tour of the checked views.
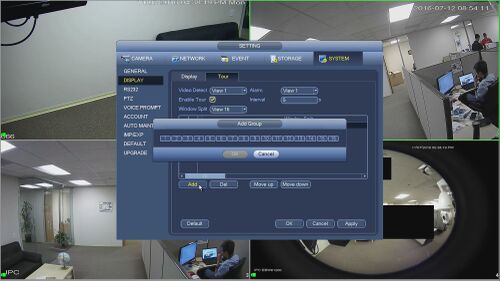
4. Now setup one tour under the grid view you want to look at, this demo is 16 views.
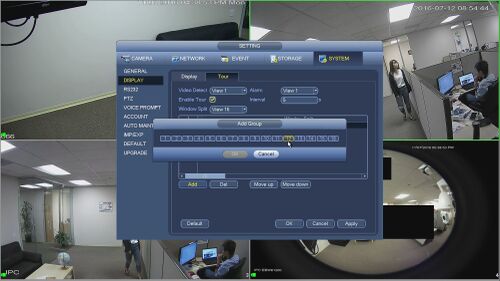
5. Select Add, and highlight the channels in the order you want to see them on the screen and click OK when finished.
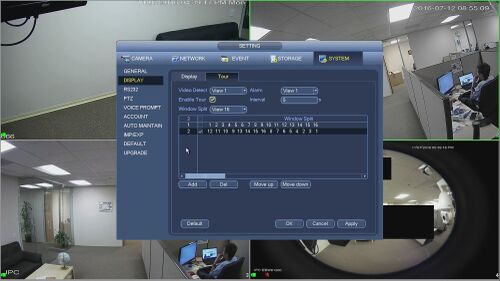
6. Make sure the custom tour that was setup is checked and then enter 120s (or the maximum) on the Interval area.
7. Select apply
How to Change Camera Order of Connected Cameras Using Sequence
Description
This allows you to change camera order on the view. This features differs from the previous rendition because the changes stay after a reboot.
Prerequisites
Video Instructions
Step by Step Instructions
Quick Reference
|
NVR FAQ |
|
|
Problem |
Solution |
|
NVR will not boot. |
Input power is not correct. |
|
Power connection is not correct. |
|
|
Power switch button is damaged. |
|
|
Program upgrade is wrong. |
|
|
HDD malfunction or something wrong with HDD ribbon. |
|
|
Seagate DB35.1, DB35.2,SV35 or Maxtor 17-g has compatibility problem. Please upgrade to the latest version to solve this problem. |
|
|
Front panel error. |
|
|
Main board is damaged. |
|
|
NVR often automatically shuts down or stops running. |
Input voltage is not stable or it is too low. |
|
HDD malfunction or something wrong wit the ribbon. |
|
|
Button power is not enough. |
|
|
Front video signal is not stable. |
|
|
Working environment is too harsh, too much dust. |
|
|
Hardware malfunction. |
|
|
System is unable to detect hard drive. |
HDD is broken. |
|
HDD ribbon is damaged. |
|
|
HDD cable connection is loose. |
|
|
Main board SATA port is broken. |
|
|
Video loss from 1, multiple, or all channels. |
|
|
Program is not compatible. Please upgrade to the latest version. |
|
|
Brightness is 0. Please restore factory default setup. |
|
|
Check your screen saver. |
|
|
NVR hardware malfunctions. |
|
|
I can not search local records. |
|
|
HDD ribbon is damaged. |
|
|
HDD is broken. |
|
|
Upgraded program is not compatible. |
|
|
The recorded file has been overwritten. |
|
|
Record function has been disabled |
|
|
Video is distorted when searching local records. |
|
|
Video quality setup is too low. |
|
|
Program read error, bit data is too small. There is mosaic in the full screen. Please restart the NVR to solve this problem. |
|
|
HDD data ribbon error. |
|
|
HDD malfunction. |
|
|
NVR hardware malfunctions. |
|
|
Time display is not correct. |
|
|
Setup is not correct |
|
|
Battery contact is not correct or voltage is too low. |
|
|
Crystal is broken. |
|
|
NVR can not control PTZ |
|
|
Front panel PTZ error |
|
|
PTZ decoder setup, connection or installation is not correct. |
|
|
Cable connection is not correct. |
|
|
PTZ setup is not correct. |
|
|
PTZ decoder and NVR protocol is not compatible. |
|
|
PTZ decoder and NVR address is not compatible. |
|
|
When there are several decoders, please add 120 Ohm between the PTZ decoder A/B cables furthest end to delete the reverberation or impedance matching. Otherwise the PTZ control is not stable. |
|
|
The distance is too far. |
|
|
Unable to login to WebGUI |
|
|
For Windows 98 or Windows ME user, please update your system to Windows 2000 sp4. Or you can install client-end software of lower version. Please note right now, our NVR is not compatible with Windows VISTA control. |
|
|
ActiveX control has been disabled. |
|
|
No dx8.1 or higher. Please upgrade display card driver. |
|
|
Network connection error. |
|
|
Network setup error. |
|
|
Password or user name is invalid. |
|
|
Client-end is not compatible with NVR program. |
|
|
There is only mosaic no video when preview or playback video file remotely. |
|
|
Network fluency is not good. |
|
|
Client-end resources are limit. |
|
|
Current user has no right to monitor. |
|
|
Network connection is not stable. |
|
|
IP address conflict. |
|
|
MAC address conflict. |
|
|
PC or device network card is not good. |
|
|
Keyboard can not control NVR. |
|
|
NVR serial port setup is not correct |
|
|
Address is not correct |
|
|
When there are several switchers, power supply is not enough. |
|
|
Transmission distance is too far. |
|
|
Alarm signal can not been disarmed. |
|
|
Alarm setup is not correct. |
|
|
Alarm output has been open manually. |
|
|
Input device error or connection is not correct. |
|
|
Some program versions may have this problem. Please upgrade your system. |
|
|
Alarm function is null. |
|
|
Alarm setup is not correct. |
|
|
Alarm cable connection is not correct. |
|
|
Alarm input signal is not correct. |
|
|
There are two loops connect to one alarm device. |
|
|
Record storage period is not enough. |
|
|
Camera quality is too low. Lens is dirty. Camera is installed against the light. Camera aperture setup is not correct. |
|
|
HDD capacity is not enough. |
|
|
HDD is damaged. |
|
|
Can not playback the downloaded file. |
|
|
There is no media player. |
|
|
No DXB8.1 or higher graphic acceleration software. |
|
|
There is no DivX503Bundle.exe control when you play the file transformed to AVI via media player. |
|
|
No DivX503Bundle.exe or ffdshow-2004 1012 .exe in Windows XP OS. |
|
|
Forgot local menu operation password or network password |
|
|
Please contact your local service engineer or our sales person for help. We can guide you to solve this problem. |
|
|
There is no video. The screen is in black. |
|
|
IPC IP address is not right. |
|
|
IPC port number is not right. |
|
|
IPC account (user name/password) is not right. |
|
|
IPC is offline. |
|
|
The displayed video is not full in the monitor. |
|
|
Please cheek current resolution setup. If the current setup is 1920*1080, then you need to set the monitor resolution as 1920*1080 |
|
|
There is no HDMI output. |
|
|
Displayer is not in HDMI mode. |
|
|
HDMI cable connection is not right. |
|
|
The video is not fluent when I view in multiple-channel mode from the client-end. |
|
|
The network bandwidth is not sufficient. The multiple-channel monitor operation needs at least 100M or higher. |
|
|
Your PC resources are not sufficient. For 16-ch remote monitor operation, the PC shall have the following environment: Quad Core, 2G or higher memory, independent displayer, display card memory 256M or higher. |
|
|
I can not connect to the IPC |
|
|
Please make sure the IPC has booted up. |
|
|
IPC network connection is right and it is online |
|
|
The device has connected to the too many IPC. It can not transmit the video. |
|
|
Check the IPC port value and the time zone is the same as the NVR. |
|
|
Make sure current network environment is stable. |
|
|
After I set the NVR resolution as 1080P, my monitor can not display. |
|
|
Shut down the device and then reboot. When you reboot, please press the Fn button at the same time and then release after 5 seconds. You can restore NVR resolution to the default setup. |
|
|
After I login the Web, I can not find the remote interface to add the IPC. |
|
|
Please clear the Web controls and load again. |
|
|
I use the VGA montior. If I use the multple-window mode, I see the video from the main stream or the sub stream. |
|
|
For 32-channel series product, the 9/16-window is using the sub stream. |
|
|
For 4/8/16 series product, system is using the main stream no matter you are in what display mode. |
|
