This Hikvision DVR and Analog System User Manual 2026 is written for homeowners, installers, facility managers, and technical operators who need a reliable end-to-end reference rather than a model-specific button list. It covers system planning, physical installation, activation, time and network configuration, hard-disk initialization, recording schedules, playback, export, remote access, maintenance, cybersecurity, and structured troubleshooting. The emphasis is not merely on making the cameras display an image; it is on creating a system whose evidence is usable, time-accurate, recoverable, and defensible.
Author: MSA
Publication target: DVRAID.com
Last reviewed: 17 August 2026
Estimated reading time: 16–20 minutes
Editorial note: This model-neutral manual explains the common workflow used by Hikvision Turbo HD DVR and analog camera systems. Menu names, firmware behavior, supported camera formats, channel capacity, codecs, and remote-access features vary by recorder model and region. Always verify the exact model number and firmware against the appropriate manufacturer documentation before changing production settings.
Introduction
A digital video recorder remains the operational center of an analog surveillance system. It receives video from cameras over coaxial cable, converts and compresses the signal, stores footage on a surveillance-grade hard disk, presents live and recorded video, and—when deliberately enabled—provides network access for authorized users. Hikvision Turbo HD DVRs are designed to modernize existing coaxial infrastructure while supporting high-definition analog video and, on selected models, hybrid access to network cameras. Hikvision describes its DVR portfolio as suitable for residential premises, retail, warehouses, offices, construction sites, banks, and other facilities that need practical on-premises security.[1]
This Hikvision DVR and Analog System User Manual 2026 is written for homeowners, installers, facility managers, and technical operators who need a reliable end-to-end reference rather than a model-specific button list. It covers system planning, physical installation, activation, time and network configuration, hard-disk initialization, recording schedules, playback, export, remote access, maintenance, cybersecurity, and structured troubleshooting. The emphasis is not merely on making the cameras display an image; it is on creating a system whose evidence is usable, time-accurate, recoverable, and defensible.
The most important principle is procedural discipline. A surveillance system should be installed in a controlled sequence: identify the equipment, connect and test it before mounting, establish administrator security, verify time, initialize storage, configure recording behavior, test retrieval, and document the final state. The official Hikvision support material similarly organizes the user experience around installation, configuration, operation, and maintenance, including a startup wizard, faster search tools, password recovery options, and current firmware mechanisms.[2]
1. Understanding the Hikvision Analog System
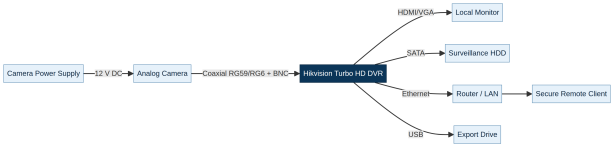
A conventional analog system contains five functional layers: the camera, the coaxial transmission path, the DVR, the storage medium, and the operator interface. A camera produces an analog high-definition signal; a BNC-terminated coaxial cable carries that signal to a compatible DVR input; the DVR digitizes and records it; a SATA hard disk retains the data; and an HDMI or VGA display allows local control. Ethernet adds the management and remote-viewing layer, but it is not required for local recording.
Hikvision’s Turbo HD family is not a single recorder specification. It is a broad product category containing different series and feature levels. The manufacturer currently presents PowerX, Value, Ultra, Special, eDVR, and back-end accessories as distinct categories. Some models include intelligent human or vehicle detection, faster target search, perimeter-related functions, two-way audio, or hybrid IP-camera support; others focus on economical high-definition encoding and durable recording.[1] Therefore, never assume that a feature shown on a newer product page exists on an older DVR merely because both products carry the Hikvision name.
| Component | Primary function | Verification before installation |
| Turbo HD or compatible analog camera | Captures video, and sometimes audio, illumination or analytic metadata | Resolution, signal standard, lens, IR range, power requirement, weather rating |
| Coaxial cable and BNC connectors | Carries the camera signal from the field to the recorder | Cable condition, connector integrity, distance, grounding and interference |
| Hikvision DVR | Receives, encodes, displays, stores and manages video | Channel count, supported formats, encoding limits, firmware and outputs |
| Surveillance HDD | Stores continuous or event-based footage | Capacity, compatibility, health, SATA power/data connection |
| Monitor and mouse | Provides local operation and live view | HDMI/VGA compatibility, resolution, secure physical placement |
| Router or LAN | Enables optional local or remote network access | Gateway, DNS, segmentation, firewall and approved access method |
.
Figure 1. Conceptual topology of a Hikvision analog surveillance system. This original diagram is intended for explanatory use and is not a substitute for the wiring diagram supplied with a specific model.
2. Planning Before You Install
Begin with a written camera plan. For every location, record the intended field of view, mounting height, lighting conditions, cable route, power source, privacy limitations, and whether the scene requires identification, recognition, or general observation. A wide view can establish that an event occurred but may not preserve enough facial or license-plate detail for identification. Conversely, a narrow view may provide detail but leave blind areas. The correct design balances coverage, pixel density, illumination, retention, and lawful surveillance purpose.
Test the complete system on a workbench or table before fixing cameras permanently. DVRAID’s installation guidance recommends preparing enough space, power sockets, a monitor, the mouse, the router when remote access is desired, and the camera connections before mounting equipment.[4] This simple step isolates configuration errors from installation errors. It also allows the installer to label each camera and channel, confirm the image orientation, and verify that the selected power supplies do not overload a shared distribution point.
Use compatible cable and avoid routing coaxial video beside high-current electrical wiring, fluorescent-ballast circuits, motors, or unprotected radio transmitters. Poor connectors, water ingress, ground loops, voltage drop, and electromagnetic interference can produce symptoms that resemble a defective DVR. Outdoor cable should be protected from abrasion and moisture, and every exterior penetration should be sealed without trapping water around the connector.
Before connecting the network, identify the legal and organizational requirements that apply to the site. Surveillance signage, audio recording, retention periods, access logging, employee monitoring, and remote viewing may be regulated by local law. A technically correct installation can still be non-compliant if it records areas that should be private, retains footage indefinitely, or grants access to people without a legitimate need.
3. Physical Installation and First Power-On
Place the DVR in a dry, ventilated, access-controlled location. Do not stack it directly on heat-producing equipment or obstruct its ventilation openings. Connect the display and mouse first. Connect each camera to the intended BNC input and use the manufacturer-approved power arrangement. If the recorder supports audio, alarm input/output, RS-485 or limited IP channels, connect only the interfaces that the model’s documentation explicitly supports.
Power on the display before or immediately after powering the recorder so that the initial resolution negotiation can be observed. If no picture appears, check the monitor input selection, HDMI/VGA cable, output resolution, and whether the DVR is actually completing its boot sequence. Do not repeatedly interrupt the power during a first boot or hard-disk initialization.
The first-run interface normally asks the operator to activate the recorder by creating an administrator password. Use a long, unique password that is not reused on the router, email account, camera, or another site. Do not leave a default credential active. Store the credential in an approved password manager and restrict knowledge of it to authorized administrators. Depending on the firmware, the recorder may also provide security questions, a reserved email option, an exported recovery file, or an unlock pattern. DVRAID’s earlier GUI-oriented guide documents these recovery mechanisms and recommends preserving recovery material securely.[4]
A recovery file is sensitive. It should not be uploaded to a public drive, attached to an unprotected email, or stored on a USB device that is left in the recorder. Treat the recovery process as part of the security design, not as an afterthought.
4. Using the Startup Wizard Correctly
The startup wizard is useful because it forces the operator to address the dependencies that determine whether recording will be trustworthy. Hikvision’s current support guidance describes a five-step startup wizard and highlights easy installation, configuration, operation, and maintenance as central design goals.[2] However, a wizard is not a substitute for engineering judgment. Review every proposed setting rather than selecting “Next” mechanically.
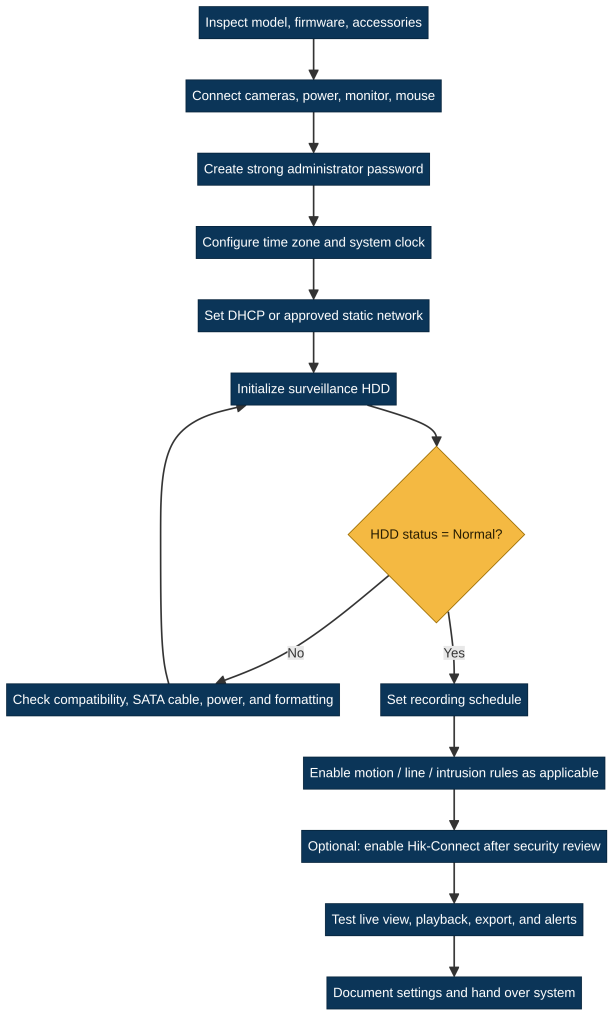
The recommended sequence is to select the correct language, verify the time zone and date format, configure the network, initialize the hard disk, review camera channels, and define the recording schedule. In some GUI generations, the order differs slightly. The underlying logic remains the same: identity, time, connectivity, storage, channels, and recording policy.
Figure 2. Original startup workflow for a model-neutral Hikvision DVR installation.
Time zone and clock accuracy
Time is evidence. Set the correct time zone, daylight-saving behavior where applicable, date format, and synchronization source. An incorrect clock can make an incident difficult to reconstruct and can create confusion when footage from multiple systems is compared. After configuration, compare the DVR clock with a trusted reference and record the observed offset. Recheck it after a power interruption and after any firmware or network change.
DHCP or a static address
DHCP is convenient during initial installation, because the router supplies an address, gateway, and often DNS information. A documented static address or a DHCP reservation may be preferable for a managed site, but it must be coordinated with the network administrator. Avoid selecting an address already used by another device. Record the IP address, subnet, gateway, DNS servers, and the management method in the handover document.
A local-only DVR does not need unrestricted internet access. If remote viewing is not required, place the recorder on an appropriately restricted network and disable unnecessary services. If remote viewing is required, use the approved secure method, strong credentials, least-privilege accounts, and current firmware. Do not expose the web interface directly to the public internet merely to make access convenient.
Hard-disk initialization
A newly installed disk generally must be initialized by the DVR before recording begins. Select the correct disk and confirm the status changes from an initialization state to Normal. Initialization erases existing data, so never perform it on a disk that may contain evidence without authorization and a verified backup. If the status does not become normal, inspect the SATA data cable, SATA power connection, disk compatibility, mounting vibration, and the recorder’s disk health information. A disk that is visible but unhealthy should not be trusted for evidentiary retention.
5. Camera Configuration and Recording Policy
Confirm that every camera is connected to the correct channel and that the image is stable in daylight and darkness. Set the camera format, resolution, frame rate, exposure, day/night behavior, infrared intensity, wide dynamic range, and image orientation only within the limits of the model. Excessive infrared reflection from a nearby wall, glass, or license plate can reduce night-time detail. Strong backlighting can hide faces even when the camera appears to be functioning normally.
Recording should reflect the security objective. Continuous recording is straightforward and provides the most complete timeline, but it consumes more storage. Motion or event-based recording reduces storage demand but may miss an event if the scene, sensitivity, detection zone, or pre-record duration is poorly configured. A hybrid policy—continuous recording for critical cameras and event-enhanced recording for lower-risk scenes—can be appropriate when retention and bandwidth are limited.
| Recording mode | Strength | Primary risk | Suitable use |
| Continuous | Provides a complete chronological record | Higher storage consumption | Entrances, cash areas, critical evidence zones |
| Motion/event | Reduces storage and focuses on activity | False negatives or excessive alarms | Lower-traffic areas with carefully tested detection |
| Continuous plus event markers | Preserves the timeline while improving search | Requires clear schedule and event configuration | Most mixed commercial deployments |
.
Set pre-record and post-record intervals where supported. Configure motion zones to exclude trees, roads, reflective surfaces, and other recurring nuisance sources. Do not treat artificial-intelligence labels as proof of identity; analytics assist search and alerting, but an operator should review the underlying video.
Current Hikvision product information describes AcuSearch and Smart Search functions that can accelerate retrieval by filtering targets or drawing rules around areas of interest.[1] Availability depends on the DVR and firmware. Even where these features exist, retain a conventional time-and-channel search method so operators can recover footage when metadata is absent or incorrect.
6. Live View, Playback, and Evidence Export
Live view should be tested on every channel after the final camera mounting. Verify that the displayed camera name and physical location match. Use descriptive labels such as “North Entrance” instead of leaving channels as “Camera 01.” A label is operational metadata: it reduces the risk that an operator exports the wrong viewpoint during a stressful incident.
For playback, begin with the incident time, select the channel, and broaden the search window when necessary. Confirm whether the relevant channel is continuous, motion-based, or event-based. If the footage appears missing, check the time zone, daylight-saving setting, recording schedule, overwrite behavior, HDD status, and whether the camera was disconnected during the period in question.
When exporting, select the smallest useful time range while preserving context before and after the event. Use a clean, dedicated USB drive or an approved network destination. Export the native or proprietary format when authenticity and later verification matter, and create a broadly compatible copy only when required for ordinary review. Keep a chain-of-custody record containing the recorder identity, channel, start and end times, export operator, export date, file hash where organizational policy requires it, and the storage location.
Do not edit original evidence. If a clip must be shortened for sharing, preserve the original export and record that a derivative copy was created. Watermarks, player software, and metadata may be valuable to later verification; their handling should follow the organization’s evidence policy.
7. Remote Viewing and Secure Network Access
Remote viewing is a convenience with security consequences. First confirm that the user genuinely needs remote access. Then create named accounts with only the permissions required for live view, playback, export, or administration. Do not share the administrator password with ordinary operators. Review account activity and remove accounts when personnel or contractors leave the project.
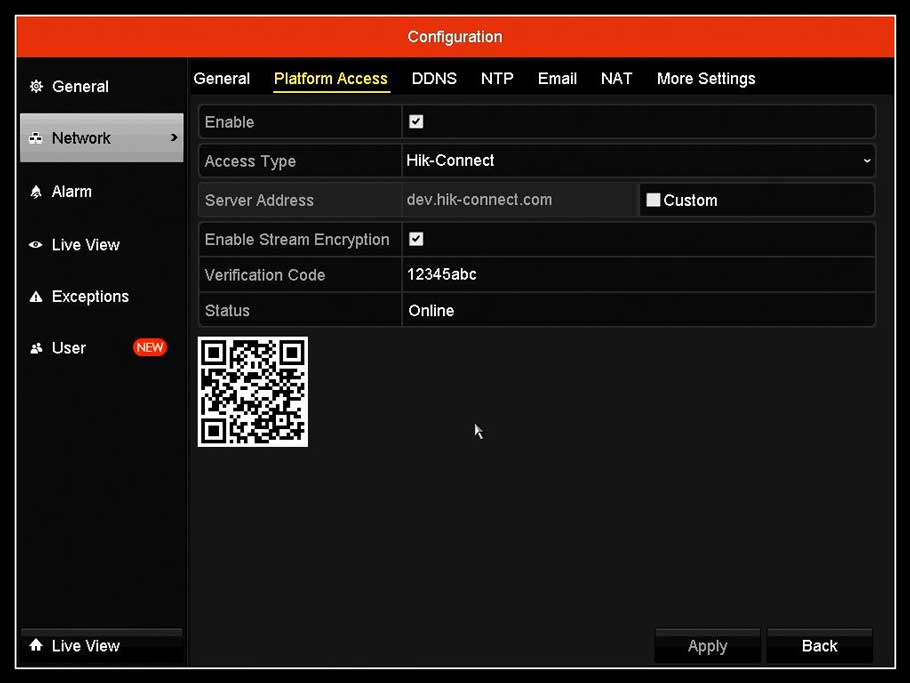
Hikvision provides ecosystem options such as Hik-Connect and installer-oriented tools, while current support material also discusses configuration through local devices, web interfaces, and mobile applications.[2] DVRAID provides a separate Hik-Connect setup guide and a browser and plugin support guide. Because interfaces and support change across firmware generations, use the official documentation for the exact model and keep the remote client updated.
Use HTTPS or the manufacturer’s secure service when available, disable unused protocols and services, and avoid port-forwarding the recorder directly to the internet unless a qualified network professional has documented the risks and compensating controls. A site-to-site VPN or controlled remote-access architecture is usually easier to govern than a publicly exposed device. Segment cameras and recorders from ordinary office workstations where possible. Monitor unexpected login attempts and alert states.
Hikvision’s Cybersecurity Center publishes security advisories, best-practice material, vulnerability reporting information through the Hikvision Security Response Center, and related updates.[3] Check those resources before applying firmware. Download firmware only from a verified manufacturer or authorized support source, confirm the exact model and regional variant, export configuration where supported, and plan a rollback or recovery path. Never install firmware from an unknown forum attachment simply because its filename appears plausible.
8. Maintenance and Operational Governance
A DVR is a small computer and should be maintained accordingly. At a planned interval, inspect the HDD health, check whether all expected channels are recording, review time accuracy, clean dust from ventilation paths, test playback, verify alert behavior, and confirm that remote access is still necessary. A quarterly review is a reasonable baseline for many small systems, while high-risk sites may require more frequent checks.
Keep a configuration record with the model, serial number, firmware version, channel map, IP settings, storage capacity, retention estimate, administrator ownership, camera locations, and last successful export test. Do not place sensitive passwords in a document that is emailed broadly. Store the record in a controlled repository and keep a change history.
Retention is not simply a capacity calculation. It depends on camera count, resolution, frame rate, scene complexity, compression, continuous versus event recording, and overwrite policy. Measure the actual daily storage rate after deployment rather than relying only on a theoretical estimate. The system should be able to retain footage for the organization’s defined period while clearly communicating when older footage will be overwritten.
9. Troubleshooting Guide
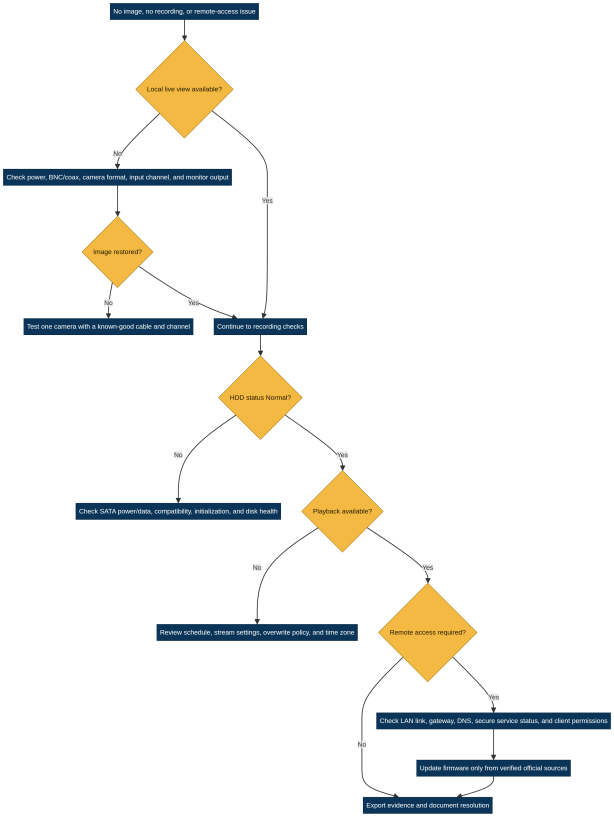
Troubleshooting should move from the physical layer to the storage layer and then to the network layer. Change one variable at a time and document the result. If a camera fails, substitute a known-good cable or channel rather than immediately changing multiple settings.
Figure 3. Original decision flow for common no-image, no-recording, playback, and remote-access faults.
No image or unstable image
Check the camera power supply, BNC seating, cable continuity, camera format compatibility, channel selection, and monitor output. Test the camera at the DVR with a short known-good cable. If the image returns, the field cable or connector route is the likely cause. If it does not, test a known-good camera on the same channel. This isolates the camera, cable, channel, and recorder systematically.
The DVR is not recording
Open the storage information screen and confirm the disk status is Normal. If no disk is detected, check power and SATA connections. If the disk is detected but uninitialized, initialize it only after confirming that no needed data will be erased. Then inspect the schedule, recording stream, channel enablement, and overwrite settings. Check that the system clock is correct; footage may be present under an unexpected time range.
Playback shows gaps
Gaps may be intentional when motion recording is selected, or they may indicate a schedule, camera, power, storage, or time problem. Compare the gaps across channels. A simultaneous gap across every channel suggests a recorder, power, or clock issue; a gap on one camera suggests a channel, cable, camera, or individual schedule issue.
Remote access fails
Verify local live view first. If local operation works, check the LAN link, IP address, subnet, gateway, DNS, client permissions, service status, and any site firewall policy. Do not begin by opening additional router ports. Confirm that the client is using a supported, current method and that the account is not locked or expired. For deeper questions, consult the Hikvision Video Recorders FAQ and the exact model documentation.
Audible warning or repeated beeping
Warnings can indicate a missing or unhealthy HDD, video loss, network condition, or another exception. Identify the exception before silencing the audible warning. Disabling every alert without correcting the cause removes an important diagnostic control. DVRAID’s Hikvision DVR setup guide explains where exception and audible-warning controls have appeared in common GUI generations.[4]
10. Final Commissioning Checklist
Before handing over the system, confirm that every camera has a meaningful label, the image is acceptable in day and night conditions, the clock is accurate, the HDD reports a healthy normal state, the intended recording schedule is active, and playback works for more than one channel. Perform a controlled export and open it on an approved workstation. Verify that user accounts, permissions, remote access, alert rules, and firmware documentation are recorded.
The commissioning package should also state what the system does not guarantee. Analytics may misclassify objects, a camera cannot identify details outside its optical and lighting limits, and a recorder cannot restore footage that was never captured or was overwritten. Clear limitations are a mark of professional engineering.
Conclusion
A Hikvision DVR and analog camera system is reliable when its physical installation, storage policy, time source, user permissions, network exposure, and maintenance schedule are designed as one system. The correct 2026 workflow is therefore not a single setup wizard click path. It is a repeatable process that begins with model verification and lawful camera planning, proceeds through controlled activation and hard-disk initialization, and ends with tested playback, secure export, documented remote access, and scheduled maintenance.
For readers who need a practical companion, the DVRAID Hikvision DVR system setup guide provides additional installation context, while the PTZ-to-DVR connection guide addresses a specialized RS-485 and control scenario. For manufacturer-level updates, consult Hikvision’s DVR product portfolio, NVR/DVR support tips, and Cybersecurity Center.
Frequently Asked Questions
Is this manual valid for every Hikvision DVR?
It is a model-neutral operational guide, not a replacement for a model-specific manual. Channel count, supported analog standards, hybrid capacity, menu names, firmware behavior, analytics, and remote-access options differ. Confirm the exact model and firmware before making changes.
Should a Hikvision DVR use DHCP or a static IP address?
DHCP is convenient for initial setup, whereas a documented static address or DHCP reservation can improve predictability in a managed network. The correct choice depends on the site’s network policy. In both cases, document the address and avoid exposing the recorder unnecessarily to the public internet.
Why does a new HDD need initialization?
The DVR must prepare the disk for its recording system. Initialization normally erases existing content, so it must be authorized and verified before use. A successful setup should show a normal or equivalent healthy status.
Is motion recording better than continuous recording?
Neither is universally better. Continuous recording preserves the most complete timeline but uses more capacity. Motion recording can extend retention but depends on carefully tested detection settings. Critical scenes often benefit from continuous recording or a hybrid policy.
Can I use any firmware file found online?
No. Use a verified official or authorized support source and confirm exact model, regional variant, and upgrade procedure. Incorrect firmware can disable functions or make the recorder unusable. Review current manufacturer security advisories before upgrading.
References
[1] Hikvision, Digital Video Recorder—Turbo HD Products.
[2] Hikvision, Easy-to-use Tips for NVRs & DVRs.
[3] Hikvision, Cybersecurity Center.
[4] DVRAID, How to Set up a Hikvision DVR System.
[5] DVRAID, Hikvision Video Recorders FAQ.
[6] DVRAID, What Is Hik-Connect and How to Set Up the Hik-Connect App.
[7] DVRAID, Browser and Plugin Support for Hikvision Devices.
[8] DVRAID, Connecting a PTZ Camera to a DVR Device.
Long-Tail SEO Keywords
Hikvision DVR and analog system user manual 2026, how to set up a Hikvision analog DVR system, Hikvision Turbo HD DVR installation guide for beginners, Hikvision DVR first time setup wizard instructions, how to initialize a hard drive in Hikvision DVR, Hikvision DVR recording schedule configuration guide, how to configure motion detection on Hikvision DVR, Hikvision DVR continuous recording versus motion recording, how to set the time and date on Hikvision DVR, Hikvision DVR DHCP versus static IP configuration, how to enable secure remote viewing on Hikvision DVR, Hikvision DVR Hik-Connect setup for remote camera access, how to export video footage from Hikvision DVR to USB,
Hikvision DVR playback and evidence export procedure, Hikvision analog CCTV camera BNC wiring guide, Hikvision Turbo HD camera compatibility with DVR, how to troubleshoot no video on Hikvision DVR, Hikvision DVR hard drive not detected troubleshooting, Hikvision DVR playback gaps and missing footage, Hikvision DVR audible warning and video loss solution, Hikvision DVR firmware update cybersecurity checklist, Hikvision DVR administrator password recovery options,
Hikvision DVR camera channel labeling best practices, Hikvision DVR surveillance storage retention planning, Hikvision DVR remote access without unsafe port forwarding, Hikvision analog CCTV system maintenance checklist, Hikvision DVR night vision and infrared troubleshooting, Hikvision DVR smart search and AcuSearch guide, Hikvision DVR human and vehicle detection configuration, Hikvision DVR system commissioning checklist 2026, professional Hikvision DVR setup for small business, secure Hikvision DVR network segmentation guide, Hikvision DVR native video export and chain of custody, how to connect a PTZ camera to Hikvision DVR, Hikvision DVR analog camera system troubleshooting flowchart